
1.简介
Aidlux是一种基于安卓手机的开发环境,可以方便的在手机上开发C++、Python等程序,还可以运行Pytorch等深度学习框架。安装Aidlux之后的手机可以理解为增强版的OpenMV。
正好手里的小米11手机屏幕摔碎了,屏幕维修价格比二手的还贵,刚好拿来做个小车玩一玩。
- 小米11
- Arduino UNO
- 两轮差速小车
flowchart LR
手机 --USB串口--> Arduino --DRV8833--> 小车
2.手机部分
2.1 Scrcpy手机投屏设置
因为手机屏幕已经碎了,操作很不方便,因此设置投屏方便后续操作。虽然小米手机有官方的投屏方法,不过我这次用了更通用更方便的Scrcpy投屏,晨钟酱Official做了汉化可以免费使用,具体的下载、安装和设置在这里不再多做赘述,可以参考下面的链接。
https://www.bilibili.com/video/BV1pU4y1b7kE/?vd_source=5896b1818b29c8956651abd2ccdf821f
使用投屏开发还可以避免OLED烧屏。Scrcpy支持有线和无线(同一路由器),在这里我们用无线投屏。
2.2 Aidlux安装
Aidlux的个人版可以直接在小米应用商店安装,如果应用商店没有也可以直接参考Aidlux官方文档
安装之后会有一个权限设置过程,按照APP提示一步步操作即可。

安装好的Aidlux自带了几个例程,可以直接运行。本文的人手检测就是基于例子中的手势检测例程。

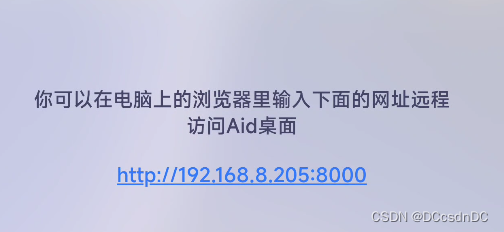
Aidlux支持局域网访问,点击桌面上的Cloud_ip即可获得一串网址,在局域网内任意浏览器输入即可打开远程开发界面。
2.3 手部识别代码
这里使用官方给出的手部识别例程
https://docs.aidlux.com/#/ai/ai-examples?id=_6-%e6%89%8b%e5%8a%bf%e8%af%86%e5%88%ab-hand-tracking
'''本文件用于examples中的人体姿势跟踪案例'''‘’’
导入基础包作用详解
‘’’
#导入包介绍开始
#cvs包是Aid内置的代替cv2的包,基本上cv2支持的函数cvs一样支持,cvs包在X模式下和非X模式下一样执行
#cvs更多详细介绍查看官网文档OpenCVhttps://www.aidlearning.net/showdoc/web/#/5?page_id=45
from cvs import *#math模块提供了许多对浮点数的数学运算函数。
import math#NumPy(Numerical Python) 是 Python 语言的一个扩展程序库,支持大量的维度数组与矩阵运算,此外也针对数组运算提供大量的数学函数库。
#在机器学习算法中大部分都是调用Numpy库来完成基础数值计算的。
import numpy as np#ciPy,发音为Sigh Pi,是一个科学的python开源代码,在BSD许可下分发的库,用于执行数学,科学和工程计算。
#special包含了科学计算中的各种特殊函数
#expit函数,也称为logistic sigmoid函数,定义为expit(x)= 1 /(1 + exp(-x))。 它是logit函数的反函数。
from scipy.special import expit#导入python时间控制包
import timetflite_gpu,GPU加速代码由AID提供,TensorFlow Lite 支持多种硬件加速器。GPU 是设计用来完成高吞吐量的大规模并行工作的。
因此,它们非常适合用在包含大量运算符的神经网络上,一些输入张量可以容易的被划分为更小的工作负载且可以同时执行,通常这会导致更低的延迟。
在最佳情况下,用 GPU 在实时应用程序上做推理运算已经可以运行的足够快,而这在以前是不可能的。
import aidlite_gpu
#导入包介绍结束
aidlite = aidlite_gpu.aidlite()
‘’’
图像变形填充函数
‘’’def resize_pad(img):
""" 定义此函数用于将图像重定义大小并填充,输入到检测器
人脸检测和手掌检测网络需要256x256和128x128像素的图形作为输入。
此函数使输入图像经过填充和重定义大小,适配大小同时维持正确比例
返回值:
img1: 256x256
img2: 128x128
scale: 原图到256*256图像的缩放系数
pad: 原图的填充像素数
"""
#待处理图像的形状保存至size0变量
size0 = img.shape
#将要对图像施加的形变先参数化: w1:宽, h1:高, padw:宽填充, padh:高填充, scale:缩放系数
#如果图像0轴长于1轴,将0轴(宽width)缩小
if size0[0]>=size0[1]:
h1 = 256
w1 = 256 * size0[1] // size0[0] #'//‘运算符在Python中是地板除(取整除)
padh = 0
padw = 256 - w1 #计算宽度填充,即原宽度减去应有宽度
scale = size0[1] / w1 #通过将原图宽度除以应有宽度,得到宽缩放系数
#如果图像1轴长于0轴,将1轴(高height)缩小
else:
h1 = 256 * size0[0] // size0[1] #’//'运算符在Python中是地板除(取整除)
w1 = 256
padh = 256 - h1 #计算高度填充,即原高度减去应有高度
padw = 0
scale = size0[0] / h1 #通过将原图高度除以应有高度,得到高缩放系数#将填充值细化为1、2,分别代表地板除以2和天花板除以2得到的值 padh1 = padh//2 #地板除 floor division padh2 = padh//2 + padh%2 #天花板除 ceiling division padw1 = padw//2 padw2 = padw//2 + padw%2 #对原图进行重定义大小操作 #注意:cv2的resize函数需作用于Numpy.array对象 img1 = cv2.resize(img, (w1,h1)) #再进行填充操作 #方法参数:pad(array, pad_width, mode, **kwargs) #方法返回:填充后的数组 #参数解释: #array:表示需要填充的数组; #pad_width:表示每个轴(axis)边缘需要填充的数值数目。 #参数输入方式为:((before_1, after_1), … (before_N, after_N)),其中(before_1, after_1)表示第1轴两边缘分别填充before_1个和after_1个数值。 #mode:表示填充的方式(取值:str字符串或用户提供的函数) #constant’——表示连续填充相同的值,每个轴可以分别指定填充值,constant_values=(x, y)时前面用x填充,后面用y填充,缺省值填充0 img1 = np.pad(img1, ((padh1, padh2), (padw1, padw2), (0,0)), 'constant', constant_values=(0,0)) pad = (int(padh1 * scale), int(padw1 * scale)) #而这里重定义大小为128*128 img2 = cv2.resize(img1, (128,128)) return img1, img2, scale, pad‘’’
图像逆归一化
‘’’
def denormalize_detections(detections, scale, pad):
""" 人脸检测和手掌检测网络需要256x256和128x128像素的图形作为输入。
此函数使输入图像经过填充和重定义大小,适配大小同时维持正确比例。
此函数将归一化过的坐标值恢复成原图坐标值。
输入:
detections: nxm 张量. n 为检测数,m 为 4+2*k,其中4是指边界框的坐标,k为检测器输出的额外关键点数目
scale: 曾用于缩放图像的缩放系数scalar that was used to resize the image
pad: x和y轴的填充
"""
detections[:, 0] = detections[:, 0] * scale * 256 - pad[0]
detections[:, 1] = detections[:, 1] * scale * 256 - pad[1]
detections[:, 2] = detections[:, 2] * scale * 256 - pad[0]
detections[:, 3] = detections[:, 3] * scale * 256 - pad[1]detections[:, 4::2] = detections[:, 4::2] * scale * 256 - pad[1] detections[:, 5::2] = detections[:, 5::2] * scale * 256 - pad[0] return detections#锚点框函数,得到真实坐标
def _decode_boxes(raw_boxes, anchors):
"""
通过使用锚点框,将预测结果转换为真实坐标,同一时间处理整个batch。
"""
#boxes是一个与raw_boxes相同形状的全为0的数组
boxes = np.zeros_like(raw_boxes)
x_center = raw_boxes[…, 0] / 128.0 * anchors[:, 2] + anchors[:, 0]
y_center = raw_boxes[…, 1] / 128.0 * anchors[:, 3] + anchors[:, 1]w = raw_boxes[..., 2] / 128.0 * anchors[:, 2] h = raw_boxes[..., 3] / 128.0 * anchors[:, 3] boxes[..., 0] = y_center - h / 2. # ymin boxes[..., 1] = x_center - w / 2. # xmin boxes[..., 2] = y_center + h / 2. # ymax boxes[..., 3] = x_center + w / 2. # xmax for k in range(4): offset = 4 + k*2 keypoint_x = raw_boxes[..., offset ] / 128.0 * anchors[:, 2] + anchors[:, 0] keypoint_y = raw_boxes[..., offset + 1] / 128.0 * anchors[:, 3] + anchors[:, 1] boxes[..., offset ] = keypoint_x boxes[..., offset + 1] = keypoint_y return boxes#将张量转化为正确的探测值
def _tensors_to_detections(raw_box_tensor, raw_score_tensor, anchors):
"""网络输出的是一个形状为(b,896,16)的张量。
包含绑定立方体的回归预测,以及一个形状为(b,896,1)的张量,附带分类置信度。
此函数将两个“生”张量转化为正确的探测值,
返回一个张量列表,每一个张量对应batch中的一张图,形状为(num_detections, 17) 。
本函数基于的源代码:
mediapipe/calculators/tflite/tflite_tensors_to_detections_calculator.cc
mediapipe/calculators/tflite/tflite_tensors_to_detections_calculator.proto
"""
#检测盒,存放由预测结果转化成的真实坐标
detection_boxes = _decode_boxes(raw_box_tensor, anchors)thresh = 100.0 raw_score_tensor = np.clip(raw_score_tensor, -thresh, thresh) detection_scores = expit(raw_score_tensor) #提示:由于我们把分数张量的最后一个维度舍弃了,又只对一个class进行处理。 #于是我们就可以使用遮罩来将置信度过低的盒子过滤掉 mask = detection_scores >= 0.75 #因为batch的每张图都有不同数目的检测结果 #我们使用循环,一次处理一个结果 boxes = detection_boxes[mask] scores = detection_scores[mask] scores = scores[..., np.newaxis] #numpy.hstack等价于np.concatenate,水平拼接 return np.hstack((boxes, scores))#nms算法
def py_cpu_nms(dets, thresh):
"""Pure Python NMS baseline.(NMS: Non-Maximum Suppression, 非极大值抑制.
顾名思义,抑制不是极大值的元素,可以理解为局部最大搜索)"""
x1 = dets[:, 0]
y1 = dets[:, 1]
x2 = dets[:, 2]
y2 = dets[:, 3]
scores = dets[:, 12]areas = (x2 - x1 + 1) * (y2 - y1 + 1) #从大到小排列,取index order = scores.argsort()[::-1] #keep为最后保留的边框 keep = [] while order.size > 0: #order[0]是当前分数最大的窗口,之前没有被过滤掉,肯定是要保留的 i = order[0] keep.append(dets[i]) #计算窗口i与其他所以窗口的交叠部分的面积,矩阵计算 xx1 = np.maximum(x1[i], x1[order[1:]]) yy1 = np.maximum(y1[i], y1[order[1:]]) xx2 = np.minimum(x2[i], x2[order[1:]]) yy2 = np.minimum(y2[i], y2[order[1:]]) w = np.maximum(0.0, xx2 - xx1 + 1) h = np.maximum(0.0, yy2 - yy1 + 1) inter = w * h #交/并得到iou值 ovr = inter / (areas[i] + areas[order[1:]] - inter) #ind为所有与窗口i的iou值小于threshold值的窗口的index,其他窗口此次都被窗口i吸收 inds = np.where(ovr <= thresh)[0] #下一次计算前要把窗口i去除,所有i对应的在order里的位置是0,所以剩下的加1 order = order[inds + 1] return keep#将检测结果转化为边界框
def detection2roi(detection):
""" 将检测结果转化为有方向的边界框
改写自:mediapipe/modules/face_landmark/face_detection_front_detection_to_roi.pbtxt
边界框的中心和大小接由中心计算得到。
旋转角从向量kp1和kp2计算得到,与theta0相关。
边界框经过scale进行缩放和dy进行平移。
"""
kp1 = 2
kp2 = 3
theta0 = 90 * np.pi / 180
dscale = 1.5
dy = 0.
xc = detection[:,4+2kp1]
yc = detection[:,4+2kp1+1]
x1 = detection[:,4+2kp2]
y1 = detection[:,4+2kp2+1]
scale = np.sqrt((xc-x1)**2 + (yc-y1)**2) * 2yc += dy * scale scale *= dscale # compute box rotation x0 = detection[:,4+2*kp1] y0 = detection[:,4+2*kp1+1] x1 = detection[:,4+2*kp2] y1 = detection[:,4+2*kp2+1] theta = np.arctan2(y0-y1, x0-x1) - theta0 return xc, yc, scale, theta#提取关注区域(roi:regions of interest)
def extract_roi(frame, xc, yc, theta, scale):# 转化边界框的各点 points = np.array([[-1, -1, 1, 1], [-1, 1, -1, 1]], dtype=np.float32).reshape(1,2,4) points = points * scale.reshape(-1,1,1)/2 theta = theta.reshape(-1, 1, 1) #numpy.concatenate用于连接两个numpy数组 R = np.concatenate(( np.concatenate((np.cos(theta), -np.sin(theta)), 2), #numpy.cos、numpy.sin计算弧度为theta的余弦、正弦值 np.concatenate((np.sin(theta), np.cos(theta)), 2), ), 1) center = np.concatenate((xc.reshape(-1,1,1), yc.reshape(-1,1,1)), 1) points = R @ points + center # use the points to compute the affine transform that maps # these points back to the output square res = 256 points1 = np.array([[0, 0, res-1], [0, res-1, 0]], dtype=np.float32).T affines = [] imgs = [] for i in range(points.shape[0]): pts = points[i, :, :3].T print('pts', pts.shape, points1.shape, pts.dtype, points1.dtype) M = cv2.getAffineTransform(pts, points1) img = cv2.warpAffine(frame, M, (res,res))#, borderValue=127.5) imgs.append(img) affine = cv2.invertAffineTransform(M).astype('float32') affines.append(affine) if imgs: imgs = np.stack(imgs).astype(np.float32) / 255.#/ 127.5 - 1.0 affines = np.stack(affines) else: imgs = np.zeros((0, 3, res, res)) affines = np.zeros((0, 2, 3)) return imgs, affines, points#将特征点逆归一化
def denormalize_landmarks(landmarks, affines):
# landmarks[:,:,:2] *= 256
for i in range(len(landmarks)):
landmark, affine = landmarks[i], affines[i]
landmark = (affine[:,:2] @ landmark[:,:2].T + affine[:,2:]).T
landmarks[i,:,:2] = landmark
return landmarks#绘制检测结果
def draw_detections(img, detections, with_keypoints=True):
if detections.ndim == 1:
detections = np.expand_dims(detections, axis=0)n_keypoints = detections.shape[1] // 2 - 2 for i in range(detections.shape[0]): ymin = detections[i, 0] xmin = detections[i, 1] ymax = detections[i, 2] xmax = detections[i, 3] start_point = (int(xmin), int(ymin)) end_point = (int(xmax), int(ymax)) #cv2.rectangle用于绘制矩形,参数分别为:矩形的图、左上角点、右下角点、矩形颜色、线条的粗细。 img = cv2.rectangle(img, start_point, end_point, (255, 0, 0), 1) if with_keypoints: for k in range(n_keypoints): kp_x = int(detections[i, 4 + k*2 ]) kp_y = int(detections[i, 4 + k*2 + 1]) cv2.circle(img, (kp_x, kp_y), 2, (0, 0, 255), thickness=2) return img#绘制边界框
def draw_roi(img, roi):
for i in range(roi.shape[0]):
(x1,x2,x3,x4), (y1,y2,y3,y4) = roi[i]
cv2.line(img, (int(x1), int(y1)), (int(x2), int(y2)), (0,0,0), 2)
cv2.line(img, (int(x1), int(y1)), (int(x3), int(y3)), (0,255,0), 2)
cv2.line(img, (int(x2), int(y2)), (int(x4), int(y4)), (0,0,0), 2)
cv2.line(img, (int(x3), int(y3)), (int(x4), int(y4)), (0,0,0), 2)#绘制特征点
def draw_landmarks(img, points, connections=, color=(255, 255, 0), size=2):
for point in points:
x, y = point
x, y = int(x), int(y)
#cv2.circle用于画圈,参数分别为:圆的图、圆心、半径、圆的颜色、画圆的线条的粗细(、画圆的线的类型、中心坐标和半径值中的小数位数)。
cv2.circle(img, (x, y), size, color, thickness=size)
for connection in connections:
x0, y0 = points[connection[0]]
x1, y1 = points[connection[1]]
x0, y0 = int(x0), int(y0)
x1, y1 = int(x1), int(y1)
cv2.line(img, (x0, y0), (x1, y1), (255,255,255), size)‘’’
入口
‘’’
#指定模型路径
#pose_detection用于检测体姿
#pose_landmark_upper_body用于检测上身
model_path = ‘models/pose_detection.tflite’
model_pose = ‘models/pose_landmark_upper_body.tflite’img_path = ‘imgs/serena.png’
#检测体姿模型的输入
#图片的尺寸大小,深度学习不需要尺寸过大的图片,128*128就能满足需求
#有rgb3通道
#输入数据数量的单位是字节,1个float是32位也就是4字节,每个数据4个字节
inShape =[1 * 128 * 128 34,]#4代表4个字节;896指896个框;89612指明每个框的置信度;这12个数具体意指什么、顺序如何,只有看作者训练时曾怎样定义。若无法找到定义便只能猜测和尝试。
#outShape就是输出数据的数据量 单位是字节,896是值体姿关键点4482;12代表体姿识别的6个关键点,每个点都有x,y,所以此处为12
#outShape输出图像
outShape = [1896124, 189614]##4表示4个cpu线程,0表示gpu,-1表示cpu,1表示GPU和CPU共同使用,2表示高通专有加速模式,1表示NNAPI 线程数我在aid上设置的4线程,
你可以灵活设置线程数和是否使用gpu+cpu模式;
#NNAPI (神经网络API)是 NDK中的一套API。由C语言实现。NNAPI设计的初衷是扮演底层平台的角色,
支撑上层的各种机器语言学习框架(TensorFlow List, Caffe2等)高效的完成推理计算,甚至是构建/训练模型。
NNAPI有两个显著特点:
#1. 内置于Android系统,从Android8.1系统开始出现在NDK中。
#2. 能够利用硬件加速,使用Android设备的GPU/DSP或各种专门人工智能加速芯片完成神经网络的推理运算,大大提高计算效率。
#NNAPI会根据Android设备的硬件性能,适当的将这些繁重的计算部署到合适的计算单元(CPU & GPU &DSP &神经网络芯片). 从而使用硬件加速功能完成推理运算。
print(‘gpu:’,aidlite.ANNModel(model_path,inShape,outShape,4,0))
aidlite.set_g_index(1)
#图片的尺寸大小,深度学习不需要尺寸过大的图片,这里使用256 * 256
#有rgb3通道
#输入数据数量的单位是字节,1个float是32位也就是4字节,每个数据4个字节
inShape =[1 * 256 * 256 34,]#4代表4个字,节其他参数具体参照模型
#outShape就是输出数据的数据量
#outShape输出图像
outShape = [11554, 114, 112812814]
print(‘gpu:’,aidlite.NNModel(model_pose,inShape,outShape,4,0))POSE_CONNECTIONS = [
(0,1), (1,2), (2,3), (3,7),
(0,4), (4,5), (5,6), (6,8),
(9,10),
(11,13), (13,15), (15,17), (17,19), (19,15), (15,21),
(12,14), (14,16), (16,18), (18,20), (20,16), (16,22),
(11,12), (12,24), (24,23), (23,11)
]
#指定锚框
anchors = np.load(‘models/anchors.npy’)#读取摄像头,0是后置摄像头,1是前置摄像头
cap=cvs.VideoCapture(1)
while True:
#开始一直循环读取摄像头中的每一帧,直到程序退出
image = cvs.read()
if image is None:
continue
#flip()的作用是使图像进行翻转,cv2.flip(filename, flipcode)
#filename:需要操作的图像,flipcode:翻转方式,1水平翻转,0垂直翻转,-1水平垂直翻转
#如果是前置摄像头,需要翻转图片,想象照镜子的原理
image_roi=cv2.flip(image,1)#cv2.cvtColor(p1,p2) 是颜色空间转换函数,p1是需要转换的图片,p2是转换成何种格式。 #cv2.COLOR_BGR2RGB 将BGR格式转换成RGB格式 #cv2.COLOR_BGR2GRAY 将BGR格式转换成灰度图片 frame = cv2.cvtColor(image_roi, cv2.COLOR_BGR2RGB) # frame = np.ascontiguousarray(frame[:,::-1,::-1]) img1, img2, scale, pad = resize_pad(frame) #numpy.astype()是类型转换函数 img2 = img2.astype(np.float32)’ #将RGB值归一化 img2 = img2 / 255.# 127.5 - 1.0 #记录开始时间 start_time = time.time() #切换到模型0 aidlite.set_g_index(0) #由于fp16的值区间比fp32的值区间小很多,所以在计算过程中很容易出现上溢出(Overflow,>65504 )和下溢出(Underflow,<6x10^-8 )的错误,溢出之后就会出现“Nan”的问题 #分配内存并传入数据 aidlite.setTensor_Fp32(img2,128,128) #开始运行 aidlite.invoke() bboxes = aidlite.getTensor_Fp32(0).reshape(896, -1) scores = aidlite.getTensor_Fp32(1) #将直接张量转化成真实的探测值,输出为一个形状为(b,896,16)的张量。 detections = _tensors_to_detections(bboxes, scores, anchors) #进行归一化 normalized_pose_detections = py_cpu_nms(detections, 0.3) #如果归一化后的检测值是一个不为空的列表,则将其堆叠;否则将其设为全零张量 normalized_pose_detections = np.stack(normalized_pose_detections ) if len(normalized_pose_detections ) > 0 else np.zeros((0, 12+1)) #逆归一化 pose_detections = denormalize_detections(normalized_pose_detections, scale, pad) #若所得值不为空 if len(pose_detections) >0: #将检测结果转化为有方向的边界框 xc, yc, scale, theta = detection2roi(pose_detections) #转化边界框的各点 img, affine, box = extract_roi(frame, xc, yc, theta, scale) # print(img.shape) #切换至模型1 aidlite.set_g_index(1) ##由于fp16的值区间比fp32的值区间小很多,所以在计算过程中很容易出现上溢出(Overflow,>65504 )和下溢出(Underflow,<6x10^-8 )的错误,溢出之后就会出现“Nan”的问题 #分配内存并传入数据img aidlite.setTensor_Fp32(img,256,256) #开始预测 aidlite.invoke() # flags = aidlite.getTensor_Fp32(1).reshape(-1,1) normalized_landmarks = aidlite.getTensor_Fp32(0).copy().reshape(1, 31, -1) mask = aidlite.getTensor_Fp32(2) landmarks = denormalize_landmarks(normalized_landmarks, affine) # print('out', normalized_landmarks.shape, affine.shape, landmarks.shape, flags) #绘制边界框 draw_roi(image_roi, box) #计算经过时间 t = (time.time() - start_time) # print('elapsed_ms invoke:',t*1000) #显示时间 lbs = 'Fps: '+ str(int(100/t)/100.)+" ~~ Time:"+str(t*1000) +"ms" cvs.setLbs(lbs) for i in range(len(flags)): landmark, flag = landmarks[i], flags[i] if flag>.5: draw_landmarks(image_roi, landmark[:,:2], POSE_CONNECTIONS, size=2) #显示边界框 cvs.imshow( image_roi)
在上面的程序中,我们关心的实际上只有一个数值,就是手部的中心点位置,如果手在画面左侧,就让小车顺时针旋转,反之亦然。
其实我们也可以再关注手部的面积,通过面积判断距离,再控制小车前进后退。我这里没写,所以不多做赘述。
2.3 手机串口输出
获取到我们所需的数值后,我们需要通过手机的USB接口将数据发送出来。这里我们参考网上的例子如下。
#encode='utf-8' from cvs import * import android import time import json droid=android.Android()print("waiting…")
result = droid.startSearchSerialUsb()
print("OK…", end = " ")
print(result)
#获取连接并判断
devices = json.loads(result[1])
print(devices)
if devices : # == ‘true’:
print(‘连接成功…’)
else:
print(‘No connection’)
while True:
print("Please plugin Arduino!")
time.sleep(1)#连接串口
def connect_device(devices):
for device in devices:
#if device[‘deviceId’] == 2005:
#if device[‘deviceId’] == select_device_id:
#connection = droid.connectSerialUsb(device[‘port’], device[‘deviceId’], select_baud)
connection = droid.connectSerialUsb(0, device[‘deviceId’], 115200)
print(connection)
connect_result = connection[1]
if connect_result == ‘true’:
print(‘连接成功’)#接收,接收的默认16进制print,需要decode一下
def accept_message():
message = droid.getReceiveData()[1]
if message!=‘’:
mystr=bytes.fromhex(message).decode()
print(mystr)
#print(type(message))
#if message != "":
# print(message)
#print(chr(message))#写数据
#默认发送16进制,需要将字符串转换
def OTG_write(msg):
droid.writeSerialData((msg+‘\r\n’).encode().hex())
print(‘OUT:’+msg+‘\r\n’)
#droid.writeSerialData("0x2233445566")#断开连接
def reset_connection():
droid.disconnectSerialUsb()
print(‘…断开连接…’)connect_device(devices)
while True:
needSend="100"
OTG_write(needSend)
#droid.writeSerialData((‘HELLO’+‘\r\n’).encode().hex())
#time.sleep(1)
accept_message()
time.sleep(1)
reset_connection()
2.4 手机端代码
综合上面的两个例子,手机端最终的代码如下
#encode='utf-8' import android import time import json droid=android.Android()import cv2
import mathimport sys
import numpy as np
from blazeface import *
from cvs import *
import aidlite_gpu
aidlite=aidlite_gpu.aidlite()#####################################
print("waiting…")
result = droid.startSearchSerialUsb()
print("OK…", end = " ")
print(result)
#获取连接并判断
devices = json.loads(result[1])
print(devices)
if devices : # == ‘true’:
print(‘连接成功…’)
else:
print(‘No connection’)
while True:
print("Please plugin Arduino!")
time.sleep(1)#连接串口
def connect_device(devices):
for device in devices:
#if device[‘deviceId’] == 2005:
#if device[‘deviceId’] == select_device_id:
#connection = droid.connectSerialUsb(device[‘port’], device[‘deviceId’], select_baud)
connection = droid.connectSerialUsb(0, device[‘deviceId’], 115200)
print(connection)
connect_result = connection[1]
if connect_result == ‘true’:
print(‘连接成功’)#断开连接
def reset_connection():
droid.disconnectSerialUsb()
print(‘…断开连接…’)#接收,接收的默认16进制print,需要decode一下
def accept_message():
message = droid.getReceiveData()[1]
if message!=‘’:
mystr=bytes.fromhex(message).decode()
print(mystr)
#print(type(message))
#if message != "":
# print(message)
#print(chr(message))#写数据
#默认发送16进制,需要将字符串转换
def OTG_write(msg):
droid.writeSerialData((msg+‘\r\n’).encode().hex())
print(‘OUT:’+msg+‘\r\n’)
#droid.writeSerialData("0x2233445566")#####################################
def preprocess_image_for_tflite32(image, model_image_size=300):
print(type(image))
print(image.shape)
image = cv2.cvtColor(image, cv2.COLOR_BGR2RGB)
image = cv2.resize(image, (model_image_size, model_image_size))
image = np.expand_dims(image, axis=0)
image = (2.0 / 255.0) * image - 1.0
image = image.astype(‘float32’)return imagedef plot_detections(img, detections, with_keypoints=True):
output_img = img
print(img.shape)
x_min=[0,0]
x_max=[0,0]
y_min=[0,0]
y_max=[0,0]
hand_nums=len(detections)
# if hand_nums >2:
# hand_nums=2
print("Found %d hands" % hand_nums)
if hand_nums >2:
hand_nums=2
for i in range(hand_nums):
ymin = detections[i][ 0] * img.shape[0]
xmin = detections[i][ 1] * img.shape[1]
ymax = detections[i][ 2] * img.shape[0]
xmax = detections[i][ 3] * img.shape[1]
w=int(xmax-xmin)
h=int(ymax-ymin)
h=max(h,w)
h=h224./128.
# ymin-=0.08h# xmin-=0.25*w # xmax=xmin+1.5*w; # ymax=ymin+1.0*h; x=(xmin+xmax)/2. y=(ymin+ymax)/2. xmin=x-h/2. xmax=x+h/2. ymin=y-h/2.-0.18*h ymax=y+h/2.-0.18*h x_min[i]=int(xmin) y_min[i]=int(ymin) x_max[i]=int(xmax) y_max[i]=int(ymax) p1 = (int(xmin),int(ymin)) p2 = (int(xmax),int(ymax)) # print(p1,p2) cv2.rectangle(output_img, p1, p2, (0,255,0),2,1) # cv2.putText(output_img, "Face found! ", (p1[0]+10, p2[1]-10),cv2.FONT_ITALIC, 1, (0, 255, 129), 2) # if with_keypoints: # for k in range(7): # kp_x = int(detections[i, 4 + k*2 ] * img.shape[1]) # kp_y = int(detections[i, 4 + k*2 + 1] * img.shape[0]) # cv2.circle(output_img,(kp_x,kp_y),4,(0,255,255),4) return x_min,y_min,x_max,y_maxdef calc_palm_moment(image, landmarks):
image_width, image_height = image.shape[1], image.shape[0]palm_array = np.empty((0, 2), int) for index, landmark in enumerate(landmarks): landmark_x = min(int(landmark[0] * image_width), image_width - 1) landmark_y = min(int(landmark[1] * image_height), image_height - 1) landmark_point = [np.array((landmark_x, landmark_y))] if index == 0: # 手首1 palm_array = np.append(palm_array, landmark_point, axis=0) if index == 1: # 手首2 palm_array = np.append(palm_array, landmark_point, axis=0) if index == 5: # 人差指:付け根 palm_array = np.append(palm_array, landmark_point, axis=0) if index == 9: # 中指:付け根 palm_array = np.append(palm_array, landmark_point, axis=0) if index == 13: # 薬指:付け根 palm_array = np.append(palm_array, landmark_point, axis=0) if index == 17: # 小指:付け根 palm_array = np.append(palm_array, landmark_point, axis=0) M = cv2.moments(palm_array) cx, cy = 0, 0 if M['m00'] != 0: cx = int(M['m10'] / M['m00']) cy = int(M['m01'] / M['m00']) return cx, cydef calc_bounding_rect(image, landmarks):
image_width, image_height = image.shape[1], image.shape[0]landmark_array = np.empty((0, 2), int) for _, landmark in enumerate(landmarks): landmark_x = min(int(landmark[0] * image_width), image_width - 1) landmark_y = min(int(landmark[0] * image_height), image_height - 1) landmark_point = [np.array((landmark_x, landmark_y))] landmark_array = np.append(landmark_array, landmark_point, axis=0) x, y, w, h = cv2.boundingRect(landmark_array) return [x, y, x + w, y + h]input_shape=[128,128]
inShape =[1 * 128 * 128 34,]
outShape= [1 * 896184,189614]
model_path="models/palm_detection.tflite"
print(‘gpu:’,aidlite.FAST_ANNModel(model_path,inShape,outShape,4,0))
model_path="models/hand_landmark.tflite"
aidlite.set_g_index(1)
inShape1 =[1 * 224 * 224 34,]
outShape1= [1 * 634,14,14]
print(‘cpu:’,aidlite.FAST_ANNModel(model_path,inShape1,outShape1,4,0))anchors = np.load(‘models/anchors.npy’).astype(np.float32)
camid=1
cap=cvs.VideoCapture(camid)
bHand=Falsex_min=[0,0]
x_max=[0,0]
y_min=[0,0]
y_max=[0,0]fface=0.0
use_brect=Trueconnect_device(devices)
while True:
frame=cvs.read() if frame is None: continue if camid==1: # frame=cv2.resize(frame,(240,480)) frame=cv2.flip(frame,1) start_time = time.time() img = preprocess_image_for_tflite32(frame,128) # interpreter.set_tensor(input_details[0]['index'], img[np.newaxis,:,:,:]) if bHand==False: aidlite.set_g_index(0) aidlite.setTensor_Fp32(img,input_shape[1],input_shape[1]) aidlite.invoke() # t = (time.time() - start_time) # # print('elapsed_ms invoke:',t*1000) # lbs = 'Fps: '+ str(int(1/t))+" ~~ Time:"+str(t*1000) +"ms" # cvs.setLbs(lbs) raw_boxes = aidlite.getTensor_Fp32(0) classificators = aidlite.getTensor_Fp32(1) detections = blazeface(raw_boxes, classificators, anchors) x_min,y_min,x_max,y_max=plot_detections(frame, detections[0]) #print(x_min,y_min,x_max,y_max) if len(detections[0])>0 : bHand=True if bHand: hand_nums=len(detections[0]) if hand_nums>2: hand_nums=2 for i in range(hand_nums): print(x_min,y_min,x_max,y_max) xmin=max(0,x_min[i]) ymin=max(0,y_min[i]) xmax=min(frame.shape[1],x_max[i]) ymax=min(frame.shape[0],y_max[i]) roi_ori=frame[ymin:ymax, xmin:xmax] # cvs.imshow(roi) roi =preprocess_image_for_tflite32(roi_ori,224) aidlite.set_g_index(1) aidlite.setTensor_Fp32(roi,224,224) # start_time = time.time() aidlite.invoke() mesh = aidlite.getTensor_Fp32(0) # ffacetmp = tflite.getTensor_Fp32(1)[0] # print('fface:',abs(fface-ffacetmp)) # if abs(fface - ffacetmp) > 0.5: bHand=False # fface=ffacetmp # print('mesh:',mesh.shape) mesh = mesh.reshape(21, 3)/224 cx, cy = calc_palm_moment(roi_ori, mesh) # draw_landmarks(roi_ori,cx,cy,mesh) # brect = calc_bounding_rect(roi_ori, mesh) # draw_bounding_rect(use_brect, roi_ori, brect) # draw_mesh(roi_ori,mesh) frame[ymin:ymax, xmin:xmax]=roi_ori t = (time.time() - start_time) # print('elapsed_ms invoke:',t*1000) # lbs = 'Fps: '+ str(int(100/t)/100.)+" ~~ Time:"+str(t*1000) +"ms" needSend = x_min[0]+x_max[0] # if needSend>30 and needSend<450 : # needSend = 100 # elif needSend>510 and needSend<930 : # needSend = 800 # else : # needSend = 480 # needSend = 100 OTG_write(str(needSend)) # lbs = str(x_min)+str(y_min)+str(x_max)+str(y_max) lbs = str(x_min[0]+x_max[0]) cvs.setLbs(lbs) cvs.imshow(frame) sleep(1)
reset_connection()
import apkneed
3.小车部分
3.1 硬件
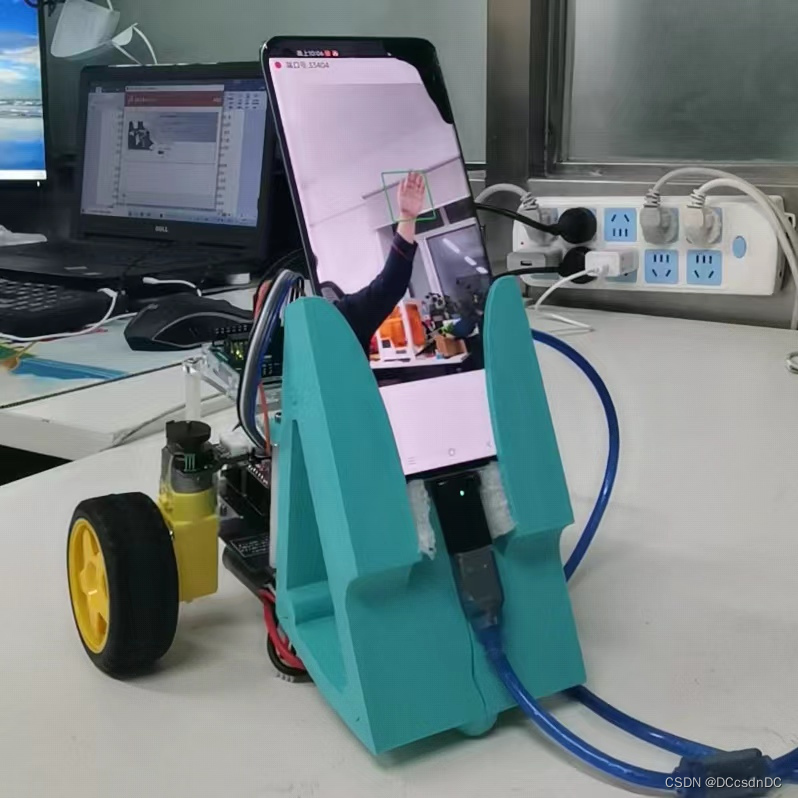
这里我使用的是之前闲置的喵呜实验室两轮平衡小车,硬件为
- STM32F103,丢了,换成Arduino UNO
- TB6612电机驱动,坏了,换成DRV8833
- 18650电池,丢了,换成2S的航模电池
- 降压模块是原版的
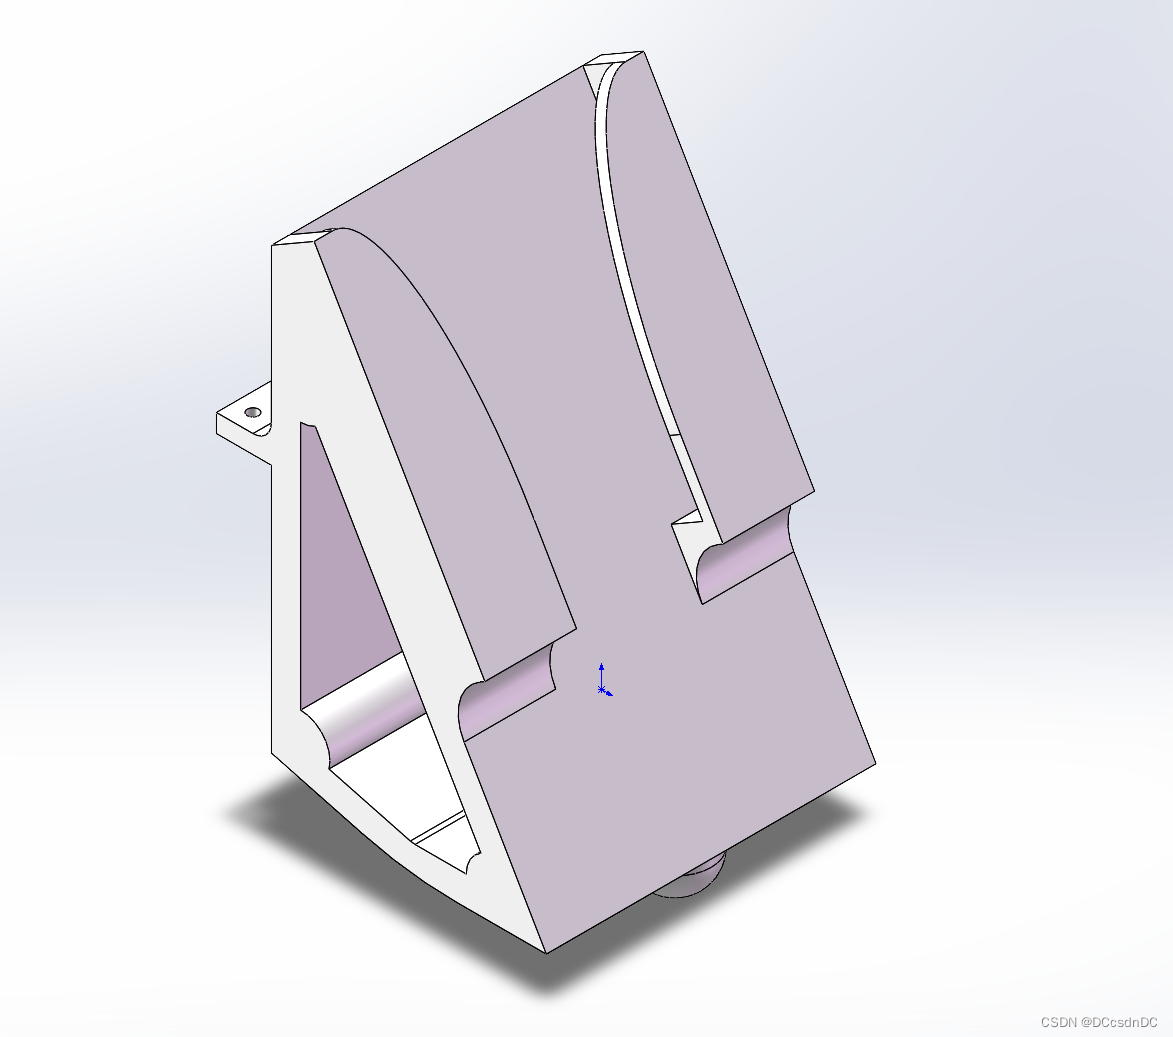
- 手机支架,自己3D打印的,底部是球形,把两轮平衡改成三轮差速车
https://miaowlabs.com/wiki/Mwbalanced.html
改造后的小车长这个样子。
=注意:必须先将手机与Arduino连接起来,再给小车上电,否则手机串口识别不到Arduino=
3.2 软件
这里主要是两个部分,电机驱动和串口接收。电机驱动部分直接使用的是DRV8833的Arduino库,虽然有霍尔编码器但是没用。
总体程序如下
#include <DRV8833.h>DRV8833 driver = DRV8833();
const int inputA1 = 3, inputA2 = 2, inputB1 = 7, inputB2 = 6;
String inputString = "0"; // a string to hold incoming data
boolean stringComplete = false; // whether the string is completevoid setup() {
driver.attachMotorA(inputA1, inputA2);
driver.attachMotorB(inputB1, inputB2);
Serial.begin(115200);
inputString.reserve(200);
}void runset(int motor, int speed, int direction){
if (motor == 1){
if (direction == 0){
driver.motorAForward(speed);
}else{
driver.motorAReverse(speed);
}
}else{
if (direction == 0){
driver.motorBForward(speed);
}else{
driver.motorBReverse(speed);
//driver.motorAStop();
}
}}
void serialEvent() {
while (Serial.available()) {
// get the new byte:
//int xbox = (int)Serial.read();
char inChar = (char)Serial.read();
// add it to the inputString:
inputString += inChar;
// if the incoming character is a newline, set a flag
// so the main loop can do something about it:
if (inChar == ‘\n’) {
stringComplete = true;
}
}
}void loop() {
if (stringComplete) {
Serial.println(inputString);
// clear the string:int box = inputString.toInt(); if (box>510 && box<930){ runset(1,140,0); runset(2,140,1); delay(20); }else if(box<450 && box>30){ runset(1,140,1); runset(2,140,0); delay(10); }else{ runset(1,0,0); runset(2,0,1); delay(1); } inputString = ""; stringComplete = false;}
runset(1,0,0);
runset(2,0,1);
delay(1);
}
4.展示
基于Aidlux的arduino小车_哔哩哔哩_bilibili](https://player.bilibili.com/player.html?aid=220230060)