2021年偶然参加了由OPPO发起,OPPO安全主办的“OPPO安全AI挑战赛“,虽然没有拿到什么名次,却对安全AI有了一定的了解。
最近,也是和各位大佬们进行了关于智慧交通领域的车辆检测相关的AI安全测试,收获满满,简单小结一下。
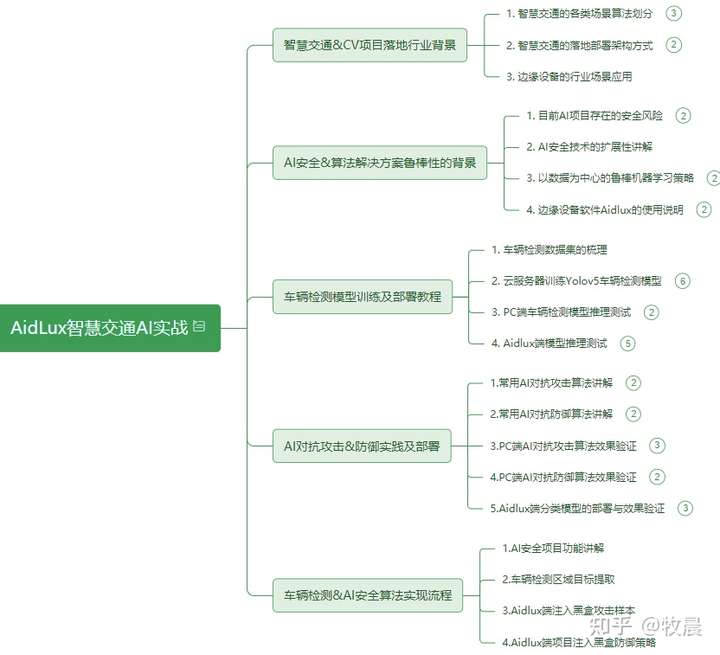
1、智慧交通的各类场景及算法划分,以及存在的AI安全现状
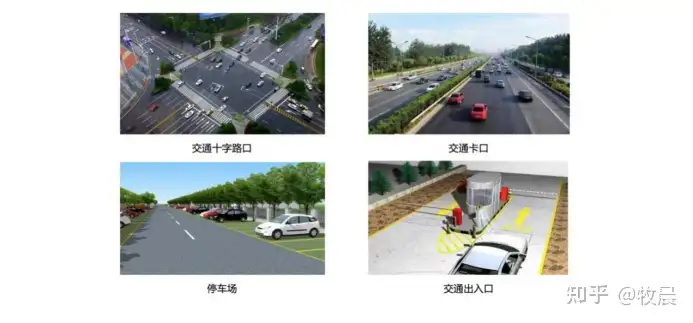
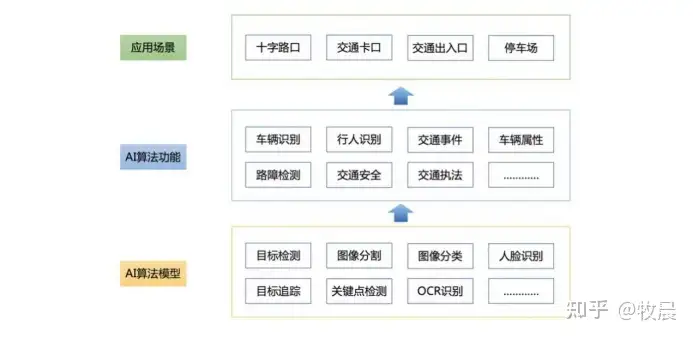
通常来说,智慧交通行业主要是对交通场景内的行人,机动车,非机动车进行识别分析。
行人识别分析包括对行人的姿态,方向,外观,以及基于行人的交通事件识别分析,(行人闯红灯等)。
机动车识别分析包括对机动车的外型,颜色,车灯,车窗,驾驶员安全事件分析(是否在打电话,是否系安全带等),车牌,车辆方向以及基于机动车的交通事件识别分析(超速检测,违停判定等)。
非机动车识别分析包括对非机动车的细分类别识别,运动状态识别,驾驶员安全事件分析(是否戴头盔等),以及基于非机动车的交通事件识别分析(非机动车闯红灯等)。
在智慧交通场景中,目标检测是AI项目里的前置任务。车辆识别,车辆属性识别,交通事件判定,交通执法判定,行人识别等智慧交通中的复合任务,都需要对感兴趣目标区域进行检测提取后才能接着进行后续的算法流程。然而,就在这些复合任务的流程中,可能会存在AI安全的风险。比如以本次训练营要讲的对抗攻击和对抗防御为例,对抗攻击能够让AI模型产生误判,从而可能引发严重的安全风险。
在对交通指示牌进行对抗攻击,主要有三种类似风格迁移的攻击模式,使得自动驾驶系统对STOP交通指示牌出现了误判,而每一种误判都可能引发严重的交通连锁后果。而智慧交通中的摄像头设备,也会接收此类对抗样本并将其作为后续算法功能的输入,从而导致算法解决方案中的某一环失效。
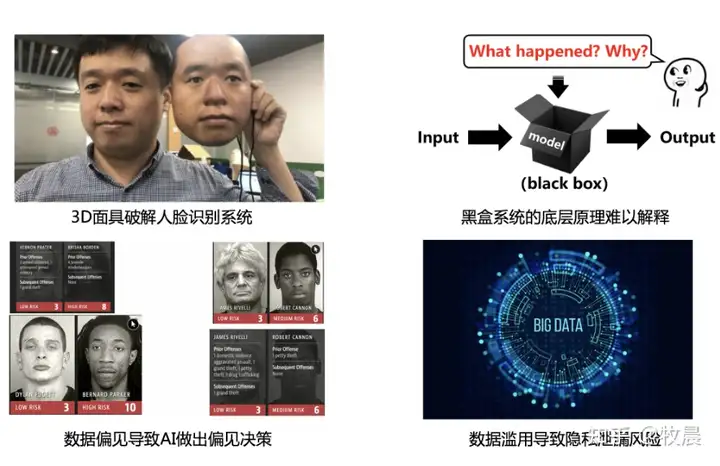
因此,提升深度学习模型的稳定性,能让模型抵御外界天然和人为的攻击,成为目前人工智能领域学术界和产业界都极为关注的问题。
2、AI对抗攻击与防御算法介绍
正所谓知己知彼,方能百战百胜。一起了解一下AI界对抗攻击与防御的各种招数吧!
2.1、所谓对抗攻击
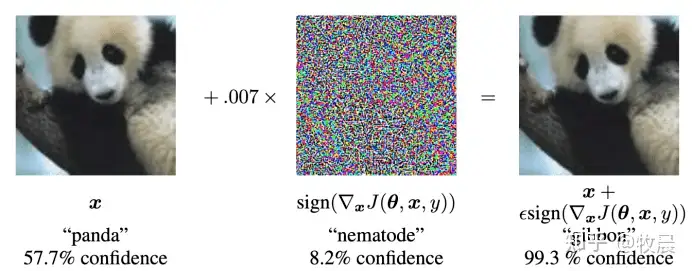
对抗攻击(adversarial attack)是AI安全方向的重要分支,其核心逻辑是在数据中增加一些微小扰
动,在人类视觉系统无法察觉的情况下,使得算法模型对这些数据产生误判。其中被增加扰动的数据
也称为对抗样本。下面是一些直观的通过增加对抗噪声来让算法模型误判的例子:
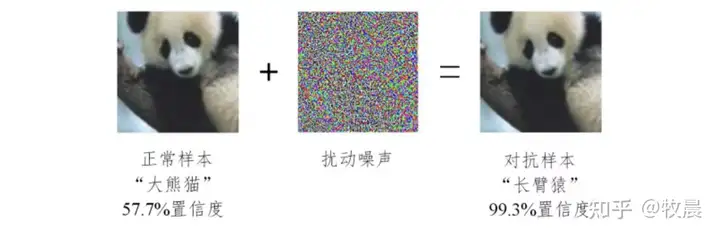
在上图的熊猫图片中加入微小的对抗噪声,就能让AI模型将其误判为长臂猿。
2.2、常用AI对抗攻击算法划分
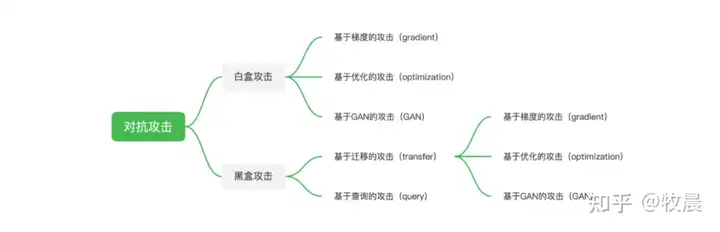
更多攻击算法的介绍可以查阅以下的相关材料:
https://zhuanlan.zhihu.com/p/493333024
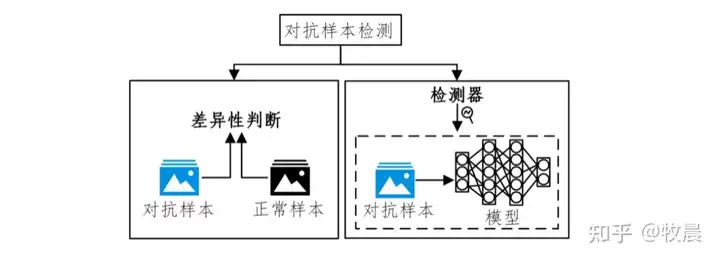
2.3、所谓对抗防御
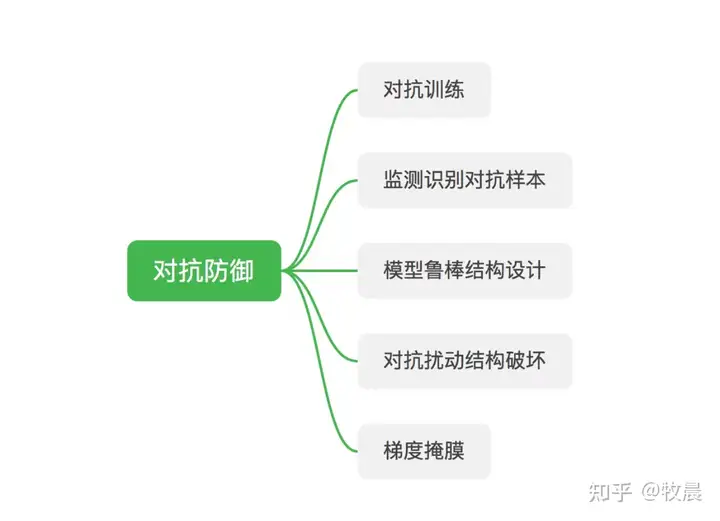
在智慧交通场景中,常用的对抗防御方法有与对抗攻击结合紧密的AI业务的鲁棒性与安全性检查工具;研究对抗攻击,来增强对实际场景中受到的攻击情形的判断力;使用对抗攻击对敏感信息进行隐藏;使用对抗样本在模型训练过程中进行对抗训练。 由于智慧交通场景的算法解决方案对耗时和内存占用有较高的要求,所以防御预处理与防御后处理作为常规防御的首要选择。 同时,针对可能存在的安全风险,在开发阶段,设计鲁棒性的模型结构,提升算法解决方案的整体安全性。 或者训练轻量级的对抗攻击检测模型,作为算法解决方案的安全模块,在受到攻击风险时,启动防御算法功能。
2.4、常用AI对抗防御算法划分
2.5、对抗攻击VS对抗防御
import os
import torch
import torch.nn as nn
from torchvision.models import mobilenet_v2
from advertorch.utils import predict_from_logits
from advertorch.utils import NormalizeByChannelMeanStd
from advertorch.attacks import LinfPGDAttack
from advertorch_examples.utils import ImageNetClassNameLookup
from advertorch_examples.utils import bhwc2bchw
from advertorch_examples.utils import bchw2bhwc
device = "cuda" if torch.cuda.is_available() else "cpu"
### 读取图片
def get_image():
    img_path = os.path.join("E:/Aidlux/2/Lesson4_code/Lesson4_code/adv_code/images", "school_bus.png")
    img_url = "https://farm1.static.flickr.com/230/524562325_fb0a11d1e1.jpg"
    def _load_image():
        from skimage.io import imread
        return imread(img_path) / 255。
    if os.path.exists(img_path):
        return _load_image()
    else:
        import urllib
        urllib.request.urlretrieve(img_url, img_path)
        return _load_image()
def tensor2npimg(tensor):
    return bchw2bhwc(tensor[0].cpu().numpy())
### 展示攻击结果
def show_images(model, img, advimg, enhance=127):
    np_advimg = tensor2npimg(advimg)
    np_perturb = tensor2npimg(advimg - img)
    pred = imagenet_label2classname(predict_from_logits(model(img)))
    advpred = imagenet_label2classname(predict_from_logits(model(advimg)))
    import matplotlib.pyplot as plt
    plt.figure(figsize=(10, 5))
    plt.subplot(1, 3, 1)
    plt.imshow(np_img)
    plt.axis("off")
    plt.title("original image\n prediction: {}".format(pred))
    plt.subplot(1, 3, 2)
    plt.imshow(np_perturb * enhance + 0.5)
    plt.axis("off")
    plt.title("the perturbation,\n enhanced {} times".format(enhance))
    plt.subplot(1, 3, 3)
    plt.imshow(np_advimg)
    plt.axis("off")
    plt.title("perturbed image\n prediction: {}".format(advpred))
    plt.show()
normalize = NormalizeByChannelMeanStd(
    mean=[0.485, 0.456, 0.406], std=[0.229, 0.224, 0.225])
### 常规模型加载
model = mobilenet_v2(pretrained=True)
model.eval()
model = nn.Sequential(normalize, model)
model = model.to(device)
### 数据预处理
np_img = get_image()
img = torch.tensor(bhwc2bchw(np_img))[None, :, :, :].float().to(device)
imagenet_label2classname = ImageNetClassNameLookup()
### 测试模型输出结果
pred = imagenet_label2classname(predict_from_logits(model(img)))
print("test output:", pred)
### 输出原label
pred_label = predict_from_logits(model(img))
### 对抗攻击:PGD攻击算法
adversary = LinfPGDAttack(
    model, eps=8 / 255, eps_iter=2 / 255, nb_iter=80,
    rand_init=True)
### 完成攻击,输出对抗样本
advimg = adversary.perturb(img, pred_label)
### 展示源图片,对抗扰动,对抗样本以及模型的输出结果
show_images(model, img, advimg)
import os
import torch
import torch.nn as nn
from torchvision.models import mobilenet_v2
from advertorch.utils import predict_from_logits
from advertorch.utils import NormalizeByChannelMeanStd
from robust_layer import GradientConcealment, ResizedPaddingLayer
from advertorch.attacks import LinfPGDAttack
from advertorch_examples.utils import ImageNetClassNameLookup
from advertorch_examples.utils import bhwc2bchw
from advertorch_examples.utils import bchw2bhwc
device = "cuda" if torch.cuda.is_available() else "cpu"
### 读取图片
def get_image():
    img_path = os.path.join("E:/Aidlux/2/Lesson4_code/Lesson4_code/adv_code/images", "school_bus.png")
    img_url = "https://farm1.static.flickr.com/230/524562325_fb0a11d1e1.jpg"
    def _load_image():
        from skimage.io import imread
        return imread(img_path) / 255.
    if os.path.exists(img_path):
        return _load_image()
    else:
        import urllib
        urllib.request.urlretrieve(img_url, img_path)
        return _load_image()
def tensor2npimg(tensor):
    return bchw2bhwc(tensor[0].cpu().numpy())
### 展示攻击结果
def show_images(model, img, advimg, enhance=127):
    np_advimg = tensor2npimg(advimg)
    np_perturb = tensor2npimg(advimg - img)
    pred = imagenet_label2classname(predict_from_logits(model(img)))
    advpred = imagenet_label2classname(predict_from_logits(model(advimg)))
    import matplotlib.pyplot as plt
    plt.figure(figsize=(10, 5))
    plt.subplot(1, 3, 1)
    plt.imshow(np_img)
    plt.axis("off")
    plt.title("original image\n prediction: {}".format(pred))
    plt.subplot(1, 3, 2)
    plt.imshow(np_perturb * enhance + 0.5)
    plt.axis("off")
    plt.title("the perturbation,\n enhanced {} times".format(enhance))
    plt.subplot(1, 3, 3)
    plt.imshow(np_advimg)
    plt.axis("off")
    plt.title("perturbed image\n prediction: {}".format(advpred))
    plt.show()
normalize = NormalizeByChannelMeanStd(
    mean=[0.485, 0.456, 0.406], std=[0.229, 0.224, 0.225])
### GCM模块
robust_mode = GradientConcealment()
### 常规模型+GCM模块
class Model(nn.Module):
    def __init__(self, l=290):
        super(Model, self).__init__()
        self.l = l
        self.gcm = GradientConcealment()
        # model = resnet18(pretrained=True)
        model = mobilenet_v2(pretrained=True)
        # pth_path = "/Users/rocky/Desktop/训练营/model/mobilenet_v2-b0353104.pth"
        # print(f'Loading pth from {pth_path}')
        # state_dict = torch.load(pth_path, map_location='cpu')
        # is_strict = False
        # if 'model' in state_dict.keys():
        #    model.load_state_dict(state_dict['model'], strict=is_strict)
        # else:
        #    model.load_state_dict(state_dict, strict=is_strict)
        normalize = NormalizeByChannelMeanStd(
            mean=[0.485, 0.456, 0.406], std=[0.229, 0.224, 0.225])
        self.model = nn.Sequential(normalize, model)
    def load_params(self):
        pass
    def forward(self, x):
        x = self.gcm(x)
        # x = ResizedPaddingLayer(self.l)(x)
        out = self.model(x)
        return out
### 常规模型+GCM模块 加载
model_defense = Model().eval().to(device)
### 数据预处理
np_img = get_image()
img = torch.tensor(bhwc2bchw(np_img))[None, :, :, :].float().to(device)
imagenet_label2classname = ImageNetClassNameLookup()
### 测试模型输出结果
pred_defense = imagenet_label2classname(predict_from_logits(model_defense(img)))
print("test output:", pred_defense)
pre_label = predict_from_logits(model_defense(img))
### 对抗攻击:PGD攻击算法
adversary = LinfPGDAttack(
    model_defense, eps=8 / 255, eps_iter=2 / 255, nb_iter=80,
    rand_init=True, targeted=False)
### 完成攻击,输出对抗样本
advimg = adversary.perturb(img, pre_label)
### 展示源图片,对抗扰动,对抗样本以及模型的输出结果
show_images(model_defense, img, advimg)
3、最终实现流程
最终实现逻辑步骤及部分代码梳理。
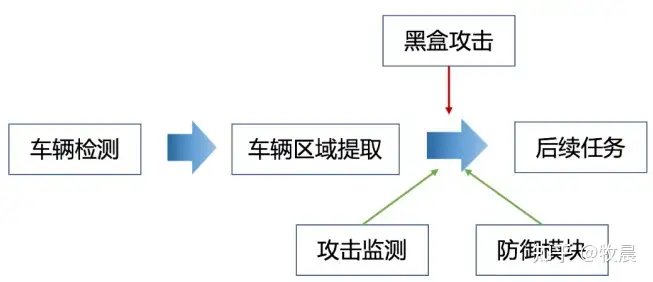
3.1实现逻辑步骤及部分代码
import os
import torch
import requests
import time
import torch.nn as nn
# aidlux相关
from cvs import *
import time
import torch
import requests
import aidlite_gpu
import torch.nn as nn
import torchvision.utils
import copy
from torchvision.models import mobilenet_v2, resnet18
from advertorch.utils import predict_from_logits
from advertorch.utils import NormalizeByChannelMeanStd
from advertorch_examples.utils import ImageNetClassNameLookup
from advertorch_examples.utils import bhwc2bchw
from advertorch_examples.utils import bchw2bhwc
from detect_adv_code import Model,Detect_Model
from advertorch.attacks import FGSM, LinfPGDAttack
from extractUtil import detect_postprocess, preprocess_img
device = "cuda" if torch.cuda.is_available() else "cpu"
normalize = NormalizeByChannelMeanStd(
    mean=[0.485, 0.456, 0.406], std=[0.229, 0.224, 0.225])
imagenet_label2classname = ImageNetClassNameLookup()
# 模型加载
### 对抗攻击常规模型加载
model = mobilenet_v2(pretrained=True)
model.eval()
model = nn.Sequential(normalize, model)
model = model.to(device)
### 对抗攻击替身模型加载
model_su = resnet18(pretrained=True)
model_su.eval()
model_su = nn.Sequential(normalize, model_su)
model_su = model_su.to(device)
### 常规模型加载
model_normal = Model().eval().to(device)
### 对抗攻击监测模型加载
model_attack = Detect_Model().eval().to(device)
"""
    model-常规模型
    model_su-替身模型
    img_np - 原始图片
    return:
    advimg - 增加对抗攻击后的图片
"""
def BlackAttack(model, model_su, img_np):
    np_img = img_np[:,:,::-1] / 255.0
    img = torch.tensor(bhwc2bchw(np_img))[None, :, :, :].float().to(device)
    ### 测试模型输出结果
    pred = imagenet_label2classname(predict_from_logits(model(img)))
    print("test output:", pred)
    ### 输出原label
    pred_label = predict_from_logits(model_su(img))
    ### 对抗攻击:PGD攻击算法
    # adversary = LinfPGDAttack(
    #     model_su, eps=8/255, eps_iter=2/255, nb_iter=80,
    #     rand_init=True, targeted=False)
    adversary = LinfPGDAttack(
    model, loss_fn=nn.CrossEntropyLoss(reduction="sum"), eps=0.3,
    nb_iter=40, eps_iter=0.01, rand_init=True, clip_min=0.0, clip_max=1.0,
    targeted=False)
    ### 对抗攻击:L2PGD攻击算法 (eps = 0.5, 2, 8)
    # adversary3 = L2PGDAttack(
    # model_su, eps=0.5, eps_iter=2/255, nb_iter=80,
    # rand_init=True, targeted=False)
    ### 完成攻击,输出对抗样本
    advimg = adversary.perturb(img, pred_label)
    # advimg = np.transpose(advimg.squeeze().numpy(), (1, 2, 0))
    return advimg
def tensor2npimg(tensor):
    return bchw2bhwc(tensor[0].cpu().numpy())
### 读取图片
def get_image(img_path):
        img_url = "https://farm1.static.flickr.com/230/524562325_fb0a11d1e1.jpg"
        if os.path.exists(img_path):
            return _load_image(img_path)
        else:
            import urllib
            urllib.request.urlretrieve(img_url, img_path)
            return _load_image(img_path)
def _load_image(img_path):
    from skimage.io import imread
    return imread(img_path) / 255.
# AidLite初始化:调用AidLite进行AI模型的加载与推理,需导入aidlite
aidlite = aidlite_gpu.aidlite()
# Aidlite模型路径
model_path = '/home/Lesson5_code/model/yolov5_car_best-fp16.tflite'
# 定义输入输出shape
in_shape = [1 * 640 * 640 * 3 * 4]
out_shape = [1 * 25200 * 6 * 4]
# 加载Aidlite检测模型:支持tflite, tnn, mnn, ms, nb格式的模型加载
aidlite.ANNModel(model_path, in_shape, out_shape, 4, 0)
# 读取图片进行推理
# 设置测试集路径
source = "/home/Lesson5_code/adv_code/test_images"
images_list = os.listdir(source)
print(images_list)
if __name__ == '__main__':
    print("是否进行攻击?")
    isAttack = input()
    # 读取图片进行推理
    # 设置测试集路径
    print(images_list)
    frame_id = 0
    # 读取数据集
    for image_name in images_list:
        frame_id += 1
        print("frame_id:", frame_id)
        image_path = os.path.join(source, image_name)
        frame = cvs.imread(image_path)
        # 1、ROI提取
        # 预处理
        img = preprocess_img(frame, target_shape=(640, 640), div_num=255, means=None, stds=None)
        # 数据转换:因为setTensor_Fp32()需要的是float32类型的数据,所以送入的input的数据需为float32,大多数的开发者都会忘记将图像的数据类型转换为float32
        aidlite.setInput_Float32(img, 640, 640)
        # 模型推理API
        aidlite.invoke()
        # 读取返回的结果
        pred = aidlite.getOutput_Float32(0)
        # 数据维度转换
        pred = pred.reshape(1, 25200, 6)[0]
        # 模型推理后处理
        pred = detect_postprocess(pred, frame.shape, [640, 640, 3], conf_thres=0.25, iou_thres=0.45)
        all_boxes = pred[0]
        frame = frame.astype(np.uint8)
        if len(all_boxes) > 0:
            for box in all_boxes:
                x, y, w, h = [int(t) for t in box[:4]]
                cut_img = frame[y:(y+h), x:(x + w)]
                # print("---", cut_img.shape)
                # 2、根据输入判断是否进行攻击
                if isAttack == 1:
                    advimg = BlackAttack(model, model_su, cut_img)
                    print("+++++", type(advimg), advimg.shape)
                else:
                    cut_img = copy.deepcopy(cut_img[:,:,::-1] / 255)
                    advimg = torch.tensor(bhwc2bchw(cut_img))[None, :, :, :].float().to(device)
                ### 无对抗攻击监测模型
                # detect_pred = model_det(advimg)
                ### 3、对抗攻击监测
                detect_pred = model_attack(advimg)
                # print(detect_pred)
                x = detect_pred.tolist()[0][0]
                ### 4、对抗攻击监测结果判断,如果风险,则报警,否则进一步进行后续业务(常规模型对样本进行分类)
                if detect_pred > 0.5:
                    id = 't50SOmT'
                    # 填写喵提醒中,发送的消息,这里放上前面提到的图片外链
                    text = "出现对抗攻击风险!!"
                    print(text)
                    print(image_name)
                    # print("结果概率:")
                    # print("%.2f" % x)
                    print("\n")
                    ts = str(time.time())  # 时间戳
                    type = 'json'  # 返回内容格式
                    request_url = "http://miaotixing.com/trigger?"
                    headers = {
                        'User-Agent': 'Mozilla/5.0 (Windows NT 10.0; Win64; x64) AppleWebKit/537.36 (KHTML, like Gecko) Chrome/87.0.4280.67 Safari/537.36 Edg/87.0.664.47'}
                    result = requests.post(request_url + "id=" + id + "&text=" + text + "&ts=" + ts + "&type=" + type,
                                        headers=headers)
                else:
                    print("正常样本")
                    print(image_name)
                    # print("结果概率:")
                    # print("%.2f" % x)
                    ### 正常样本分类
                    pred = imagenet_label2classname(predict_from_logits(model_normal(advimg)))
                    print("预测结果:")
                    print(pred)
3.2测试结果展示“喵提醒”结果示例


附视频展示:
4、结语(未完待续,随时交流)
在本次训练实战中,通过攻击与防御的较量,实现了智慧交通AI安全中的车辆检测,也get到许多新的知识以及实战过程中的一些注意事项,也是在移动端部署落地的第二个尝试。接下来我会挤时间来梳理出更详细的复盘总结教程,有问题欢迎随时沟通交流。
演示请视频移步:
基于Yolov5+Aidlux的智慧交通AI安全测试(车辆检测)
基于Yolov5+Aidlux的智慧交通AI安全测试(车辆检测)
再次感谢各位大佬的指导、讨论答疑。对训练实战感兴趣的朋友,可以移步这里哦https://mp.weixin.qq.com/s/xgOCqBRGnl9QasViLUozMw!