智慧安防实战训练营链接:https://mp.weixin.qq.com/s/xgOCqBRGnl9QasViLUozMw
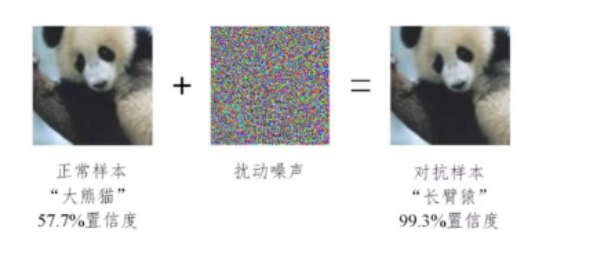
1.1 对抗攻击(adversarial attack)是AI安全方向的重要分支,其核心逻辑是在数据中增加一些微小扰
动,在人类视觉系统无法察觉的情况下,使得算法模型对这些数据产生误判。其中被增加扰动的数据
也称为对抗样本。下面是一些直观的通过增加对抗噪声来让算法模型误判的例子:
在上图的熊猫图片中加入微小的对抗噪声,就能让AI模型将其误判为长臂猿。
我们该怎么去理解对抗样本呢?总的来说,我把它当作生成噪声的艺术,其攻击价值的底层依托是算
法模型的过拟合问题
1.2 常用AI对抗攻击算法划分
上面我们了解了对抗攻击对AI项目带来的安全风险与场景应用,接下来我们再了解一下目前主流对抗
攻击算法的总体分支与逻辑:
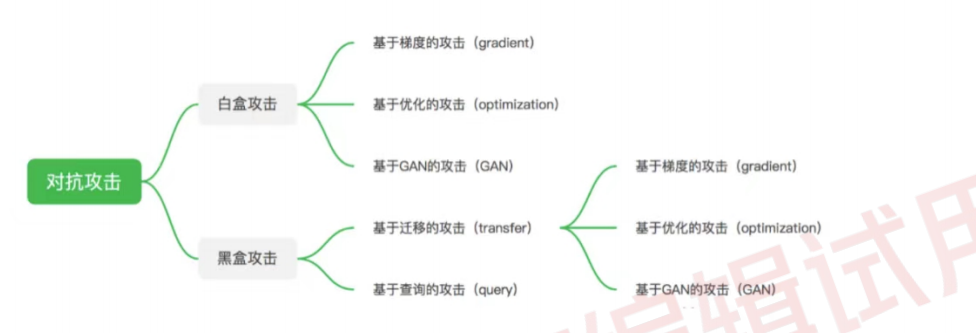
其中,当算法模型参数和训练数据等信息被攻击者所掌握,并且攻击者在此基础上进行的针对性攻击
称为白盒攻击。白盒攻击主要分为基于梯度的攻击,基于优化的攻击以及基于GAN的攻击。而在对算
法模型的结构和参数一无所知,甚至相关训练数据也一无所知的情况下,进行攻击的过程称为黑盒攻
击。
黑盒攻击主要分为基于迁移的攻击和基于查询的攻击两大类。
基于迁移的攻击逻辑由白盒攻击延伸而来,一般会有一个白盒模型作为替身模型(surrogate)进行攻
击,而生成的对抗样本一般也会对其他模型有一定的迁移攻击性。
基于查询的攻击其主要是通过查询黑盒模型的输出信息,对黑盒模型进行直接的攻击,但完成整个攻
击流程往往需要大量的查询,容易被模型所有者检测到异常。
1.3 大作业
vscode连接aidlux 显示_哔哩哔哩_bilibili
对代码进行了修改,首先读取一张汽车原始图片,然后通过YOLOV5网络检测车辆所在位置,然后提出车辆图片,原始图片内有有几个目标就是提取几个,并保存在自己创建my_extract内,然后调用迁移学习的黑盒攻击算法,使用PGD进行攻击生成攻击图片保存在adv_results内,再利用resnet50检测攻击网络进行攻击检测,将检测结果通过喵提醒进行公众号提醒。
``` import os import torch import requests import time import cv2 import aidlite_gpu import torch.nn as nn import torchvision.utils from torchvision.models import mobilenet_v2,resnet18 from advertorch.utils import predict_from_logits from advertorch.utils import NormalizeByChannelMeanStd from robust_layer import GradientConcealment, ResizedPaddingLayer from timm.models import create_model from cvs import * from utilsyolo import detect_postprocess, preprocess_img, draw_detect_res, extract_detect_res from advertorch.attacks import L2PGDAttack from advertorch.attacks import LinfPGDAttack from advertorch_examples.utils import ImageNetClassNameLookup from advertorch_examples.utils import bhwc2bchw from advertorch_examples.utils import bchw2bhwc from advertorch.attacks import FGSMdevice = “cuda” if torch.cuda.is_available() else “cpu”
读取图片更改后的
def get_image(img_path):
img_path = img_path
img_url = “https://farm1.static.flickr.com/230/524562325_fb0a11d1e1.jpg”
def _load_image():
    from skimage.io import imread
    return imread(img_path) / 255.

if os.path.exists(img_path):
    return _load_image()
else:
    import urllib
    urllib.request.urlretrieve(img_url, img_path)
    return _load_image()
#提取照片更改后的
def extract_detect_res(img, all_boxes, image_name):
‘’’
检测结果提取
‘’’
img = img.astype(np.uint8)
color_step = int(255/len(all_boxes))
for bi in range(len(all_boxes)):
if len(all_boxes[bi]) == 0:
continue
count = 0
for box in all_boxes[bi]:
x, y, w, h = [int(t) for t in box[:4]]
#cv2.putText(img, f’{coco_class[bi]}', (x, y), cv2.FONT_HERSHEY_SIMPLEX, 1, (255, 255, 255), 2)
#cv2.rectangle(img, (x,y), (x+w, y+h),(0, bicolor_step, 255-bicolor_step),thickness = 2)
cut_img = img[y:(y+h), x:(x + w)]
cv2.imwrite(“/home/smart_transport/Lesson5_code/adv_code/my_extract/” + image_name + “_” + str(count) + “.jpg”,cut_img)
count += 1
cvs.imshow(cut_img)
def tensor2npimg(tensor):
return bchw2bhwc(tensor[0].cpu().numpy())
常规模型加载
class Model(nn.Module):
def init(self, l=290):
super(Model, self).init()
    self.l = l
    self.gcm = GradientConcealment()
    #model = resnet18(pretrained=True)
    model = mobilenet_v2(pretrained=True)

    # pth_path = "/Users/rocky/Desktop/训练营/model/mobilenet_v2-b0353104.pth"
    # print(f'Loading pth from {pth_path}')
    # state_dict = torch.load(pth_path, map_location='cpu')
    # is_strict = False
    # if 'model' in state_dict.keys():
    #    model.load_state_dict(state_dict['model'], strict=is_strict)
    # else:
    #    model.load_state_dict(state_dict, strict=is_strict)

    normalize = NormalizeByChannelMeanStd(
        mean=[0.485, 0.456, 0.406], std=[0.229, 0.224, 0.225])
    self.model = nn.Sequential(normalize, model)

def load_params(self):
    pass

def forward(self, x):
    #x = self.gcm(x)
    #x = ResizedPaddingLayer(self.l)(x)
    out = self.model(x)
    return out
对抗攻击监测模型
class Detect_Model(nn.Module):
def init(self, num_classes=2):
super(Detect_Model, self).init()
self.num_classes = num_classes
#model = create_model(‘mobilenetv3_large_075’, pretrained=False, num_classes=num_classes)
model = create_model(‘resnet50’, pretrained=False, num_classes=num_classes)
    # self.multi_PreProcess = multi_PreProcess()
    pth_path = os.path.join("/home/smart_transport/Lesson5_code/model", 'track2_resnet50_ANT_best_albation1_64_checkpoint.pth')
    #pth_path = os.path.join("/Users/rocky/Desktop/训练营/Lesson5_code/model/", "track2_tf_mobilenetv3_large_075_64_checkpoint.pth")
    state_dict = torch.load(pth_path, map_location='cpu')
    is_strict = False
    if 'model' in state_dict.keys():
        model.load_state_dict(state_dict['model'], strict=is_strict)
    else:
        model.load_state_dict(state_dict, strict=is_strict)
    normalize = NormalizeByChannelMeanStd(
        mean=[0.485, 0.456, 0.406], std=[0.229, 0.224, 0.225])
    # self.model = nn.Sequential(normalize, self.multi_PreProcess, model)
    self.model = nn.Sequential(normalize, model)

def load_params(self):
    pass

def forward(self, x):
    # x = x[:,:,32:193,32:193]
    # x = F.interpolate(x, size=(224,224), mode="bilinear", align_corners=True)
    # x = self.multi_PreProcess.forward(x)
    out = self.model(x)
    if self.num_classes == 2:
        out = out.softmax(1)
        #return out[:,1:]
        return out[:,1:]
#v5部分提取图片并保存在my——extract
AidLite初始化:调用AidLite进行AI模型的加载与推理,需导入aidlite
aidlite = aidlite_gpu.aidlite()
Aidlite模型路径
model_path = ‘/home/smart_transport/Lesson5_code/yolov5_code/models/yolov5_car_best-fp16.tflite’
定义输入输出shape
in_shape = [1 * 640 * 640 * 3 * 4]
out_shape = [1 * 25200 * 6 * 4]
加载Aidlite检测模型:支持tflite, tnn, mnn, ms, nb格式的模型加载
aidlite.ANNModel(model_path, in_shape, out_shape, 4, 0)
获取一张图片
img_path = os.path.join(“/home/smart_transport/Lesson5_code/adv_code/test_images”, “vid_5_27620.jpg”)
img_name = “vid_5_27620.jpg”
frame = cvs.imread(img_path)
预处理
img = preprocess_img(frame, target_shape=(640, 640), div_num=255, means=None, stds=None)
数据转换:因为setTensor_Fp32()需要的是float32类型的数据,所以送入的input的数据需为float32,大多数的开发者都会忘记将图像的数据类型转换为float32
aidlite.setInput_Float32(img, 640, 640)
模型推理API
aidlite.invoke()
读取返回的结果
pred = aidlite.getOutput_Float32(0)
数据维度转换
pred = pred.reshape(1, 25200, 6)[0]
模型推理后处理
pred = detect_postprocess(pred, frame.shape, [640, 640, 3], conf_thres=0.25, iou_thres=0.45)
绘制推理结果
res_img = draw_detect_res(frame, pred)
cvs.imshow(res_img)
测试结果展示停顿
#time.sleep(5)
图片裁剪,提取车辆目标区域,保存在my_extract内
extract_detect_res(frame, pred,img_name)
#进行攻击图片制作
source = “/home/smart_transport/Lesson5_code/adv_code/my_extract”
images_list = os.listdir(source)
print(images_list)
frame_id = 0
读取数据集
for image_name in images_list:
frame_id += 1
print(“frame_id:”, frame_id)
image_path = os.path.join(source, image_name)
frame = cvs.imread(image_path)
normalize = NormalizeByChannelMeanStd(
mean=[0.485, 0.456, 0.406], std=[0.229, 0.224, 0.225])
### 常规模型加载
model = mobilenet_v2(pretrained=True)
model.eval()
model = nn.Sequential(normalize, model)
model = model.to(device)

### 替身模型加载
model_su = resnet18(pretrained=True)
model_su.eval()
model_su = nn.Sequential(normalize, model_su)
model_su = model_su.to(device)

### 数据预处理
np_img = get_image(image_path)
img = torch.tensor(bhwc2bchw(np_img))[None, :, :, :].float().to(device)
imagenet_label2classname = ImageNetClassNameLookup()

### 测试模型输出结果
pred = imagenet_label2classname(predict_from_logits(model(img)))
print("test output:", pred)

### 输出原label
pred_label = predict_from_logits(model_su(img))

### 对抗攻击:PGD攻击算法
adversary = LinfPGDAttack(
model_su, eps=2/255, eps_iter=2/255, nb_iter=80,
rand_init=True, targeted=False)

### 完成攻击,输出对抗样本
advimg = adversary.perturb(img, pred_label)

### 展示源图片,对抗扰动,对抗样本以及模型的输出结果
# show_images(model, img, advimg)

### 迁移攻击样本保存
save_path = "/home/smart_transport/Lesson5_code/adv_code/adv_results/"
torchvision.utils.save_image(advimg.cpu().data, save_path + "adv_image_{}.png".format(frame_id))

#记录迁移攻击样地址
adv_img_path = os.path.join(save_path, "adv_image_{}.png".format(frame_id))

#进行对抗共计监测
normalize = NormalizeByChannelMeanStd(
mean=[0.485, 0.456, 0.406], std=[0.229, 0.224, 0.225])


np_img = get_image(adv_img_path)
img = torch.tensor(bhwc2bchw(np_img))[None, :, :, :].float().to(device)
imagenet_label2classname = ImageNetClassNameLookup()


model = Model().eval().to(device)

detect_model = Detect_Model().eval().to(device)

### 对抗攻击监测
detect_pred = detect_model(img)
print(detect_pred)

if detect_pred > 0.5:
    id = 't4WL4yH'
    # 填写喵提醒中,发送的消息,这里放上前面提到的图片外链
    text = "出现对抗攻击风险!!"
    ts = str(time.time())  # 时间戳
    type = 'json'  # 返回内容格式
    request_url = "http://miaotixing.com/trigger?"

    headers = {
        'User-Agent': 'Mozilla/5.0 (Windows NT 10.0; Win64; x64) AppleWebKit/537.36 (KHTML, like Gecko) Chrome/87.0.4280.67 Safari/537.36 Edg/87.0.664.47'}

    result = requests.post(request_url + "id=" + id + "&text=" + text + "&ts=" + ts + "&type=" + type,
                        headers=headers)
else:
    pred = imagenet_label2classname(predict_from_logits(model(img)))
    print(pred)