目录
1.目标检测:yolov5火灾检以及模型的转换
2.图片云服务:七牛云图片上传下发
3.微信喵提醒
4.电脑端代码整合:火灾检测+七牛云图片服务+喵提醒
5.Android部署:Yolov5在Aidlux中部署
1.yolov5火灾检测
1.1 火灾数据集的训练:Yolo系列算法已成为工业目标检测领域的主力军,本次火灾检测主要应用的是yolov5官方代码,yolov5的官方链接为:https://**github.com/ultralytics/**yolov5。我们使用的数据集包含火灾和烟雾两种类别,yolov5训练自己的数据集可参考链接:https://blog.csdn.net/qq_45945548/article/details/121701492。训练好自己的数据集后,在路径D:\yolov5\runs\train\exp\weights(根据自己设置的来)下可以看到最优的训练模型best.pt,可以用该模型进行推理查看效果。
1.2 pt模型的转换:因为aidlux里面用的是tensorflow框架的tflite模型,所以我们先将训练好的pt模型转换成tflite模型。
先在PC端打开yolov5的代码,找到export.py,主要修改3个地方。

换成自己的yaml文件

换成待转换的pt文件

修改模型转换成的格式,将include的default修改成“tflite”
=模型权重的数值有float32、float16、int8,从float32->in8,在可以接受的精度下降范围内,推理速度可以有几倍的提升=
2.图片云服务:七牛云图片上传下发
2.1 当火灾出现时,我们想要实时查看图片,因此需要将图片上传到云服务器中,通过生成外链的方式发送到我们的微信上。根据大白老师的推荐,我们选用七牛云平台实现图片的上传下发。
七牛云平台的注册流程为:
(1)登录官网https://www.qiniu.com/,注册一个新账户
(2)登录账号,进入系统后台,在左上角的折叠栏选择“对象存储Kodo","空间管理”
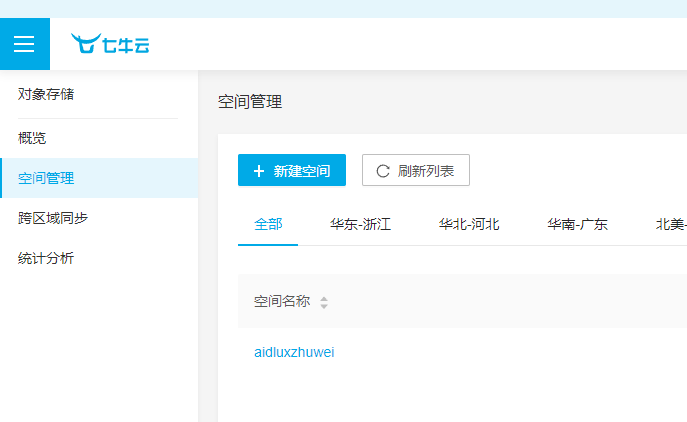
(3)点击“新建空间”,在右面跳出的弹窗中,输入“存储空间名称”,访问控制修改成“公开”,点击“确定”。
测试流程:先用系统自带的域名,下发检测图片。
(1)点进去自己创建的空间,并点击文件管理,点击上传文件,上传图片
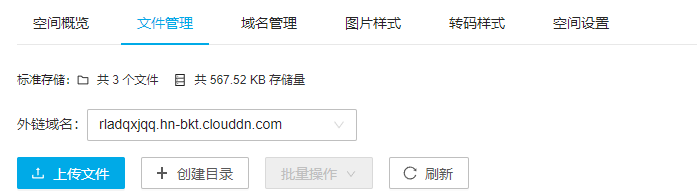
(2)返回文件管理页面,可以看到页面中我们上传的图片,点击更多,选择其中的复制外链,即可得到图片的外链
(3)在浏览器中输入外链后即可查看我们上传的图片。
2.2 图片上传及其外链获取代码
``` from qiniu import Auth, put_file from qiniu import CdnManager # 配置七牛云信息 access_key = "HDAyrRLj1z1PLsdHGAKE52FbJfkdafg9vrKRtxF1" secret_key = "3wC1L3HugvGf_gnz5Xx1rEcFUDNXYqUjcCn5JPcl" bucket_name = "aidluxzhuwei" bucket_url = "rladqxjqq.hn-bkt.clouddn.com" q = Auth(access_key, secret_key) cdn_manager = CdnManager(q)将本地图片上传到七牛云中
def upload_img(bucket_name, file_name, file_path):
# generate token
token = q.upload_token(bucket_name, file_name)
put_file(token, file_name, file_path)
获得七牛云服务器上file_name的图片外链
def get_img_url(bucket_url, file_name):
img_url = ‘http://%s/%s’ % (bucket_url, file_name)
return img_url
需要上传到七牛云上面的图片的路径
image_up_name = “data/detect_fire.jpg”
上传到七牛云后,保存成的图片名称
image_qiniu_name = “detect_fire.jpg”
将图片上传到七牛云,并保存成image_qiniu_name的名称
upload_img(bucket_name, image_qiniu_name, image_up_name)
取出和image_qiniu_name一样名称图片的url
url_receive = get_img_url(bucket_url, image_qiniu_name)
print(url_receive)
需要刷新的文件链接,由于不同时间段上传的图片有缓存,因此需要CDN清除缓存,
urls = [url_receive]
URL刷新缓存链接,一天有500次的刷新缓存机会
refresh_url_result = cdn_manager.refresh_urls(urls)
<p>主要填写的有access_key,secret_key,bucket_name和bucket_url四个参数</p>
<p>(1)在七牛云右上角的菜单栏中有密钥管理</p>
<p><img src="https://pic2.zhimg.com/80/v2-fad8eed44f0130c657d8981b9f4132f5_720w.webp" alt="" /></p>
<p>进入后可以看到AK和SK,即对应access_key和secret_key两个值</p>
<p>(2)bucket_name:自己创建的空间名称(这里用的是aidluxzhuwei)</p>
<p>(3)bucket_url:通过七牛云的测试域名可以得到下发图片的外链。点击“空间管理”后,页面的右下角,会跳出一个测试域名。</p>
<p><img src="https://pic1.zhimg.com/v2-07d1c33944a2736df9776292009321cc_r.jpg" alt="" /></p>
<p>填写上相应的信息后,在Pycharm或者Vscode软件中运行上述代码,可以得到上传的图片的url信息,在浏览器中输入url信息后即可看到图片信息。</p>
<h1>3.微信喵提醒</h1>
<p>3.1 注册流程:</p>
<p>(1)关注“喵提醒”的公众号,点击回复消息中最后的“注册账号”,填写手机号码进行注册</p>
<p>(2)点击菜单栏的“提醒”,并选择“新建”</p>
<p>(3)填写相关信息后保存,会跳出自己的专属”喵码“和”网址“</p>
<p><img src="https://pic1.zhimg.com/v2-5351ca90a530d0f4eec177836e69bd64_r.jpg" alt="" /></p>
<p>3.2 喵提醒代码</p>
mport time
import requests
填写对应的喵码
id = ‘tPmDu18’
填写喵提醒中,发送的消息,这里放上前面提到的图片外链
text = “告警图片:” + “http://rgcr52hj7.hn-bkt.clouddn.com/girl_2022.jpg”
ts = str(time.time()) # 时间戳
type = ‘json’ # 返回内容格式
request_url = “http://miaotixing.com/trigger?”
headers = {
‘User-Agent’: ‘Mozilla/5.0 (Windows NT 10.0; Win64; x64) AppleWebKit/537.36 (KHTML, like Gecko) Chrome/87.0.4280.67 Safari/537.36 Edg/87.0.664.47’}
result = requests.post(request_url + “id=” + id + “&text=” + text + “&ts=” + ts + “&type=” + type,headers=headers)
print(result)
<p>这里注意将喵码替换成自己的即可。</p>
<h1>4.电脑端整合代码:火灾检测+七牛云图片服务+喵提醒</h1>
import argparse
import os
import platform
import sys
from pathlib import Path
import torch
import torch.backends.cudnn as cudnn
FILE = Path(file).resolve()
ROOT = FILE.parents[0] # YOLOv5 root directory
if str(ROOT) not in sys.path:
sys.path.append(str(ROOT)) # add ROOT to PATH
ROOT = Path(os.path.relpath(ROOT, Path.cwd())) # relative
from models.common import DetectMultiBackend
from utils.dataloaders import IMG_FORMATS, VID_FORMATS, LoadImages, LoadStreams
from utils.augmentations import letterbox
from utils.general import (LOGGER, check_file, check_img_size, check_imshow, check_requirements, colorstr, cv2,
increment_path, non_max_suppression, print_args, scale_coords, strip_optimizer, xyxy2xywh)
from utils.plots import Annotator, colors, save_one_box
from utils.torch_utils import select_device, time_sync
import numpy as np
from qiniu import Auth, put_file
from qiniu import BucketManager
import time
import requests
配置七牛云信息
access_key = “HDAyrRLj1z1PLsdHGAKE52FbJfkdafg9vrKRtxF1”
secret_key = “3wC1L3HugvGf_gnz5Xx1rEcFUDNXYqUjcCn5JPcl”
bucket_name = “aidluxzhuwei”
bucket_url = “rladqxjqq.hn-bkt.clouddn.com”
q = Auth(access_key, secret_key)
bucket = BucketManager(q)
将本地图片上传到七牛云中
def upload_img(bucket_name, file_name, file_path):
# generate token
token = q.upload_token(bucket_name, file_name, 3600)
put_file(token, file_name, file_path)
获得七牛云服务器上file_name的图片外链
def get_img_url(bucket_url, file_name):
img_url = ‘http://%s/%s’ % (bucket_url, file_name)
return img_url
@torch.no_grad()
def run(
weights=ROOT / ‘yolov5s.pt’, # model.pt path(s)
source=ROOT / ‘data/images’, # file/dir/URL/glob, 0 for webcam
data=ROOT / ‘data/coco128.yaml’, # dataset.yaml path
imgsz=(640, 640), # inference size (height, width)
conf_thres=0.25, # confidence threshold
iou_thres=0.45, # NMS IOU threshold
max_det=1000, # maximum detections per image
device=‘’, # cuda device, i.e. 0 or 0,1,2,3 or cpu
view_img=False, # show results
save_txt=False, # save results to *.txt
save_conf=False, # save confidences in --save-txt labels
save_crop=False, # save cropped prediction boxes
nosave=False, # do not save images/videos
classes=None, # filter by class: --class 0, or --class 0 2 3
agnostic_nms=False, # class-agnostic NMS
augment=False, # augmented inference
visualize=False, # visualize features
update=False, # update all models
project=ROOT / ‘runs/detect’, # save results to project/name
name=‘exp’, # save results to project/name
exist_ok=False, # existing project/name ok, do not increment
line_thickness=3, # bounding box thickness (pixels)
hide_labels=False, # hide labels
hide_conf=False, # hide confidences
half=False, # use FP16 half-precision inference
dnn=False, # use OpenCV DNN for ONNX inference
):
# Load model
device = select_device(device)
model = DetectMultiBackend(weights, device=device, dnn=dnn, data=data, fp16=half)
stride, names, pt = model.stride, model.names, model.pt
imgsz = check_img_size(imgsz, s=stride)  # check image size

# load video and inference
cap = cv2.VideoCapture("data/video/video.mp4")
frame_id = 0
while cap.isOpened():
    ok, im = cap.read()
    if not ok:
        print("Camera cap over!")
        continue
    frame_id += 1
    if not int(frame_id) % 5 == 0: continue
    fire = 0
    im0 = im.copy()
    img = letterbox(im, imgsz, stride=32, auto=True)[0]

    # Convert
    img = img.transpose((2, 0, 1))[::-1]  # HWC to CHW, BGR to RGB
    im = np.ascontiguousarray(img)
    im = torch.from_numpy(im).to(device)
    im = im.half() if half else im.float()  # uint8 to fp16/32
    im /= 255  # 0 - 255 to 0.0 - 1.0
    if len(im.shape) == 3:
        im = im[None]  # expand for batch dim

    # Inference
    pred = model(im, augment=augment, visualize=visualize)

    # NMS
    pred = non_max_suppression(pred, conf_thres, iou_thres, classes, agnostic_nms, max_det=max_det)
    for i, det in enumerate(pred):  # per image
        if len(det):
            # Rescale boxes from img_size to im0 size
            det[:, :4] = scale_coords(im.shape[2:], det[:, :4], im0.shape).round()
            for *xyxy, conf, cls in reversed(det):
                cls = int(cls)  # integer class
                if cls != 0:
                    continue
                if cls == 0:
                    person = 1
                label = None if hide_labels else (names[cls] if hide_conf else f'{names[cls]} {conf:.2f}')
                p1, p2 = (int(xyxy[0]), int(xyxy[1])), (int(xyxy[2]), int(xyxy[3]))
                cv2.rectangle(im0, p1, p2, (0,255,0), 2)
                cv2.putText(im0, label, (p1[0], p1[1] - 2), cv2.FONT_HERSHEY_PLAIN,2, (0, 255, 255), 2)

    if fire == 1:
        cv2.imwrite("detect_image.jpg", im0)

        # 需要上传到七牛云上面的图片的路径
        image_up_name = "detect_image.jpg"
        # 上传到七牛云后,保存成的图片名称
        image_qiniu_name = "detect_image.jpg"
        # 将图片上传到七牛云,并保存成image_qiniu_name的名称
        upload_img(bucket_name, image_qiniu_name, image_up_name)
        # 取出和image_qiniu_name一样名称图片的url
        url_receive = get_img_url(bucket_url, image_qiniu_name)
        print(url_receive)

        # 填写对应的喵码
        id = 'tPmDu18'
        # 填写喵提醒中,发送的消息,这里放上前面提到的图片外链
        text = "着火啦!!!:" + url_receive
        ts = str(time.time())  # 时间戳
        type = 'json'  # 返回内容格式
        request_url = "http://miaotixing.com/trigger?"

        headers = {
            'User-Agent': 'Mozilla/5.0 (Windows NT 10.0; Win64; x64) AppleWebKit/537.36 (KHTML, like Gecko) Chrome/87.0.4280.67 Safari/537.36 Edg/87.0.664.47'}

        result = requests.post(request_url + "id=" + id + "&text=" + text + "&ts=" + ts + "&type=" + type,
                               headers=headers)

    cv2.imshow("image",im0)
    cv2.waitKey(0)
<h1>5.yolov5在Aidlux中部署</h1>
<p>在项目实际使用的时候,我们并不是在PC端进行的项目部署,而是运行在手机端,或者边缘设备上。这里我们选择Aidlux平台进行项目的部署。</p>
<p>5.1 Aidlux的使用</p>
<p>(1)在手机商城下载Aidlux</p>
<p>(2)保证手机和电脑在同一个WIFI下,打开安装好的手机上的Aidlux软件,点击Cloud_ip,手机界面会弹出可以在电脑端登录的IP网址,输入即可将手机投影到PC端</p>
<p><img src="https://pic3.zhimg.com/v2-fe40379f3f6cbab21b874ab451dd4c26_r.jpg" alt="" /></p>
<p>(3)输入IP后,在电脑端的浏览器中,可以跳出Aidlux的登录页面,默认登录密码是“aidlux”</p>
<p>5.2 yolov5在Aidlux中的部署</p>
<p>在AIdlux中的推理代码如下:</p>
aidlux相关
from cvs import *
import aidlite_gpu
from utils import detect_postprocess, preprocess_img, draw_detect_res
import time
import cv2
七牛云相关
from qiniu import Auth, put_file
from qiniu import CdnManager
import time
import requests
import cv2
配置七牛云信息
access_key = “HDAyrRLj1z1PLsdHGAKE52FbJfkdafg9vrKRtxF1”
secret_key = “3wC1L3HugvGf_gnz5Xx1rEcFUDNXYqUjcCn5JPcl”
bucket_name = “aidluxzhuwei”
bucket_url = “rladqxjqq.hn-bkt.clouddn.com”
q = Auth(access_key, secret_key)
cdn_manager = CdnManager(q)
将本地图片上传到七牛云中
def upload_img(bucket_name, file_name, file_path):
# generate token
token = q.upload_token(bucket_name, file_name)
put_file(token, file_name, file_path)
获得七牛云服务器上file_name的图片外链
def get_img_url(bucket_url, file_name):
img_url = ‘http://%s/%s’ % (bucket_url, file_name)
return img_url
AidLite初始化:调用AidLite进行AI模型的加载与推理,需导入aidlite
aidlite = aidlite_gpu.aidlite()
Aidlite模型路径
model_path = ‘/home/lesson3_codes/yolov5_code/aidlux/best-fp16.tflite’
定义输入输出shape
in_shape = [1 * 640 * 640 * 3 * 4]
out_shape = [1 * 25200 * 7 * 4]
加载Aidlite检测模型:支持tflite, tnn, mnn, ms, nb格式的模型加载
aidlite.ANNModel(model_path, in_shape, out_shape, 4, 0)
读取视频进行推理
cap = cvs.VideoCapture(“/home/lesson3_codes/yolov5_code/aidlux/fire1.mp4”)
frame_id = 0
fire = 0
while True:
frame = cap.read()
if frame is None:
continue
frame_id += 1
if not int(frame_id) % 5 == 0: continue
# 预处理
img = preprocess_img(frame, target_shape=(640, 640), div_num=255, means=None, stds=None)
# 数据转换:因为setTensor_Fp32()需要的是float32类型的数据,所以送入的input的数据需为float32,大多数的开发者都会忘记将图像的数据类型转换为float32
aidlite.setInput_Float32(img, 640, 640)
# 模型推理API
aidlite.invoke()
# 读取返回的结果
pred = aidlite.getOutput_Float32(0)
# 数据维度转换
pred = pred.reshape(1, 25200, 7)[0]
# 模型推理后处理
pred = detect_postprocess(pred, frame.shape, [640, 640, 3], conf_thres=0.5, iou_thres=0.45)
# 绘制推理结果
res_img, fire = draw_detect_res(frame, pred, fire)
cvs.imshow(res_img)

if fire == 1:
    cv2.imwrite("detect_fire.jpg", res_img)
    person = 0
    # 需要上传到七牛云上面的图片的路径
    image_up_name = "detect_fire.jpg"
    # 上传到七牛云后,保存成的图片名称
    image_qiniu_name = "detect_fire_image.jpg"
    # 将图片上传到七牛云,并保存成image_qiniu_name的名称
    upload_img(bucket_name, image_qiniu_name, image_up_name)
    # 取出和image_qiniu_name一样名称图片的url
    url_receive = get_img_url(bucket_url, image_qiniu_name)
    print(url_receive)
    # 需要刷新的文件链接,由于不同时间段上传的图片有缓存,因此需要CDN清除缓存,
    urls = [url_receive]
    # URL刷新缓存链接,一天有500次的刷新缓存机会
    refresh_url_result = cdn_manager.refresh_urls(urls)

    # 填写对应的喵码
    id = 'tPmDu18'
    # 填写喵提醒中,发送的消息,这里放上前面提到的图片外链
    text = "着火啦!:" + url_receive
    ts = str(time.time())  # 时间戳
    type = 'json'  # 返回内容格式
    request_url = "http://miaotixing.com/trigger?"

    headers = {
        'User-Agent': 'Mozilla/5.0 (Windows NT 10.0; Win64; x64) AppleWebKit/537.36 (KHTML, like Gecko) Chrome/87.0.4280.67 Safari/537.36 Edg/87.0.664.47'}

    result = requests.post(request_url + "id=" + id + "&text=" + text + "&ts=" + ts + "&type=" + type,
                           headers=headers)
cap.release()
cv2.destroyAllWindows()
<p>注意这里的best-fp16.tflite文件为best.pt转化而来的.tflite文件,我们用可视化网站netron(<a href="https://link.zhihu.com/?target=https%3A//netron.app/">https://<strong>netron.app/</strong></a>)可以查看best-fp16.tflite的参数。</p>
<p><img src="https://pic1.zhimg.com/v2-7a1866dd90a8704964c1c5088c802c34_r.jpg" alt="" /></p>
<p><img src="https://pic2.zhimg.com/80/v2-0fce22667f55ae486042c4c6d838a15d_720w.webp" alt="" /></p>
<p>可以看到模型最后的维度为[1, 25200, 7],其中7=2(类别信息 fire,smoke)+4(位置信息)+1(前、背景概率),因此在out_shape = [1 * 25200 * 7 * 4]和数据维度转换pred = pred.reshape(1, 25200, 7)[0]都要将coco的85改为7。</p>
<p>5.3 Aidlux上传代码</p>
<p>(1)我们首先打开手机版的aidlux,并投影到电脑网页上。然后将所有代码,上传到aidlux的平台里面。</p>
<p><img src="https://pic4.zhimg.com/v2-8fb029d0af41c99da81bfc5d3975101b_r.jpg" alt="" /></p>
<p>(2)找到home文件夹,并双击进入此文件夹</p>
<p>(3)点击右上角往上的箭头“upload”,再选择Folder,将文件传到home文件夹内,yolov5.py是主函数文件,utils.py是配置文件,yolov5s.tflite是模型转换后的文件,注意将utils.py里面的coco类别改为自己的类别。</p>
<p><img src="https://pic1.zhimg.com/v2-62f5fea43bc7a8ea4781a1f37c52fbd0_r.jpg" alt="" /></p>
<p>(4)手机端运行:点击右上角的图标,选择“Build”;进入代码的运行页面,选择左上角的坐标,点击“Run Now”</p>
<p>(5)电脑端运行:</p>
<p>(A)安装Remote SSH,点击Vscode左侧的“Extensions”,输入“Remote”,针对跳出的Remote SSH,点击安装-->点击"Remote Explorer",进行远程连接的页面,点击左下角的“Open a Remote Window”,再选择“Open SSH Configuration file”</p>
<p>(B)针对跳出的弹窗,再选择第一个config。 输入连接信息,需要注意的是,这里的Host Name填写你自己的Aidlux里面Cloud_ip的地址</p>
<p>(C)保存后,在左侧会生成一个SSH服务器,鼠标放上后,会跳出一个“Connect to Host in New Window”然后会跳转到连接的页面,选择“Linux”,再选择“Continue”,输入密码,aidlux,当左下角跳出SSH Aidlux时,表示已经连接成功</p>
<p>(D)选择左上角的File,点击Open Filer,即可跳出Aidlux里面的路径-->选择文件后,在跳出的窗口中,再输入密码”aidlux“,即可打开我们已经上传的文件夹 。</p>
<p>(6)视频展示:打开链接[<a href="https://www.bilibili.com/video/BV1SG4y1x7gU/?vd_source=65ae2dc17b69e14d463db1695727a096">基于yolov5和Aidlux的火灾检测_哔哩哔哩_bilibili</a>]即可查看视频效果。</p>