一、Retinaface简介
网络上公开的资料很多,笔者理解尚浅,只能做浅显的解释,首先附上paper和github的地址:
paper: https://arxiv.org/pdf/1905.00641.pdf
Pytorch版本的github: https://github.com/biubug6/Pytorch_Retinaface
主干特征提取网络 :MobilenetV1-0.25/Resnet50
RetinaFace主要特点:
采用FPN特征金字塔提取多尺度特征,引入SSH算法加强感受野。
Retinaface结构图:
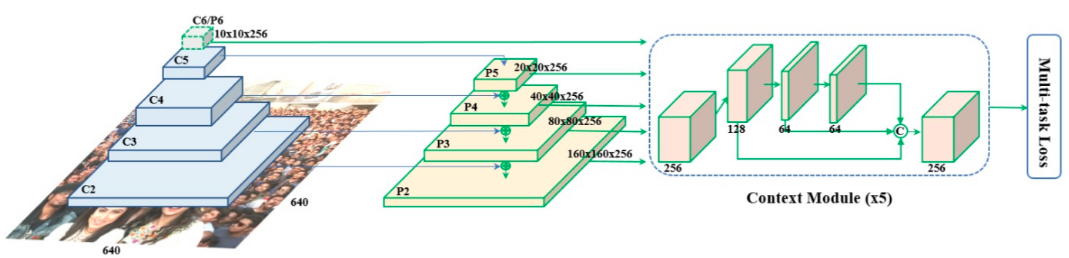
左侧两块构成FPN层,分为自顶向上和自顶向下和侧向连接的过程
自底向上:这一部分就是普通的特征提取网络,特征分辨率不断缩小,容易想到这个特征提取网络可以换成任意Backbone,并且CNN网络一般都是按照特征图大小分为不同的stage,每个stage的特征图长宽差距为2倍。在这个自底向上的结构中,一个stage对应特征金字塔的一个level。以我们要用的ResNet为例,选取conv2、conv3、conv4、conv5层的最后一个残差block层特征作为FPN的特征,记为{C2、C3、C4、C5},也即是FPN网络的4个级别。这几个特征层相对于原图的步长分别为4、8、16、32。
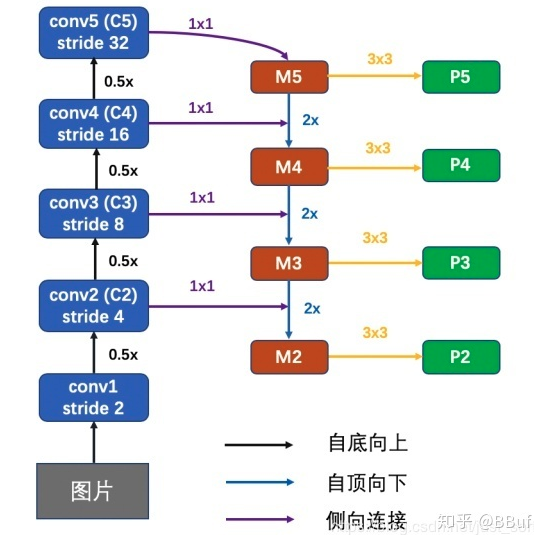
自顶向下和侧向连接:自上向下是特征图放大的过程,我们一般采用上采样来实现。FPN的巧妙之处就在于从高层特征上采样既可以利用顶层的高级语义特征(有助于分类)又可以利用底层的高分辨率信息(有助于定位)。上采样可以使用插值的方式实现。为了将高层语义特征和底层的精确定位能力结合,论文提出了类似于残差结构的侧向连接。向连接将上一层经过上采样后和当前层分辨率一致的特征,通过相加的方法进行融合。同时为了保持所有级别的特征层通道数都保持一致,这里使用卷积来实现。在网上看到一张图,比较好的解释了这个过程:
经FPN得到P3、P4、P5三个有效特征层,Retinaface为了进一步加强特征提取,使用了SSH模块加强感受野
最终得到最后的预测结果:
retinaface的预测结果分为三个:分类预测、人脸框预测、人脸关键点预测;
(1)分类预测
用于 判断先验框内部是否包含物体(二分类) ,Retinaface官方使用的是softmax进行判断。
(2)人脸框的回归
用于 对先验框(Anchors)进行调整从而获得预测框,需要四个参数, 前两个用于对先验框的中心进行调整,后两个用于对先验框的宽高进行调整(可以利用一个1x1的卷积,将SSH的通道数调整成num_anchors x 4,用于代表每个先验框的调整参数)
(3)人脸关键点的回归
用于 对先验框进行调整,从而获得人脸关键点坐标,需要十个参数, 每一个人脸关键点需要两个调整参数,对先验框中心的x、y轴进行调整获得关键点坐标,一共有五个人脸关键点(双眼中心和鼻头和两侧嘴角)。
二、Retinaface在Aidlux上的适配
Aidlux对很多python库的支持是非常友好的,我们只需要把项目迁移过来,把模型转换一下,把推理出的结果进行正确的前后处理即可,话不多少直接上代码,代码里有注释。
首先我们要定义一些模型的 配置信息 ,方便我们后面进行decode到原图:
class Retinaface(object):
    _defaults = {
        # 网络主干 涉及到后处理
        "backbone": 'mobilenet',
        # 置信度
        "confidence": 0.5,
        "nms_iou": 0.45,
        # 前处理尺寸 与aid用的模型需要一致
        "input_shape": [640, 640, 3],
        # 前处理 letterbox
        "letterbox_image": True
    }
首先是 Retinaface 的模型载入 ,这里需要与netron中的信息相对应:
model_path = 'mobilenet0_25.tflite'
in_shape = [1 * 640 * 640 * 3 * 4]
out_shape = [1 * 16800 * 10 * 4, 1 * 16800 * 2 * 4, 1 * 16800 * 4 * 4]
# 载入模型
aidlite = aidlite_gpu.aidlite()
# 载入retinaface mobilenet检测模型
aidlite.ANNModel(model_path, in_shape, out_shape, 4, 0)
读取视频流省略,取视频流中的一帧进行 预处理及检测 :
def detect_image(self, image, aidlite): # 输入图像备份 old_image = image.copy() # 把图像转换成numpy image = np.array(image, np.float32) im_height, im_width, _ = np.shape(image) # 计算scale,用于将获得的预测框转换成原图的高宽 scale = [ np.shape(image)[1], np.shape(image)[0], np.shape(image)[1], np.shape(image)[0] ] scale_for_landmarks = [ np.shape(image)[1], np.shape(image)[0], np.shape(image)[1], np.shape(image)[0], np.shape(image)[1], np.shape(image)[0], np.shape(image)[1], np.shape(image)[0], np.shape(image)[1], np.shape(image)[0] ]# letterbox resize if self.letterbox_image: image = letterbox_image(image, [self.input_shape[1], self.input_shape[0]])
附上letter_box(在保持纵横比的前提下对图像做resize,先resize然后按需要在周围填充上0像素,这样可以使图片不失真)的实现:
def letterbox_image(image, size): ih, iw, _ = np.shape(image) w, h = size scale = min(w / iw, h / ih) nw = int(iw * scale) nh = int(ih * scale)image = cv2.resize(image, (nw, nh)) new_image = np.ones([size[1], size[0], 3]) * 128 new_image[(h - nh) // 2:nh + (h - nh) // 2, (w - nw) // 2:nw + (w - nw) // 2] = image return new_image
接下来对送入检测器的图片进行预处理,这里的预处理主要是按照推理的格式增加一维即可,然后 取到模型的推理结果 :
     # 图片预处理
        photo = np.expand_dims(preprocess_input(image), 0)
        img_aid = np.float32(photo)
        aidlite.setInput_Float32(img_aid, 640, 640)
        # invoke
        aidlite.invoke()
	# 人脸关键点、得分、预测框
        landmarks_aid = aidlite.getOutput_Float32(0).reshape(1, 10, 16800)[0].transpose()
        scores_aid = aidlite.getOutput_Float32(1).reshape(1, 2, 16800)[0].transpose()
        boxes_aid = aidlite.getOutput_Float32(2).reshape(1, 4, 16800)[0].transpose()
将预测的结果 解码回原图 :
def detection_out_aid(self, boxes_aid, scores_aid, landmarks_aid, mbox_anchorbox, confidence_threshold=0.5): # boxes mbox_loc = boxes_aid # confidence mbox_conf = scores_aid[:, 1:2] # landmarks mbox_ldm = landmarks_aid # decode_bbox decode_bbox = self.decode_boxes(mbox_loc, mbox_ldm, mbox_anchorbox) # 置信度过滤 conf_mask = (mbox_conf >= confidence_threshold)[:, 0] # boxes, scores, landmarks堆叠 detection = np.concatenate((decode_bbox[conf_mask][:, :4], mbox_conf[conf_mask], decode_bbox[conf_mask][:, 4:]), -1) # 使用tf自带的非极大抑制 idx = tf.image.non_max_suppression(tf.cast(detection[:, :4], tf.float32), tf.cast(detection[:, 4], tf.float32), self._top_k, iou_threshold=self._nms_thresh).numpy() best_box = detection[idx] return best_boxdef decode_boxes(self, mbox_loc, mbox_ldm, mbox_anchorbox): # 先验框宽高 anchor_width = mbox_anchorbox[:, 2] - mbox_anchorbox[:, 0] anchor_height = mbox_anchorbox[:, 3] - mbox_anchorbox[:, 1] # 先验框中心点 anchor_center_x = 0.5 * (mbox_anchorbox[:, 2] + mbox_anchorbox[:, 0]) anchor_center_y = 0.5 * (mbox_anchorbox[:, 3] + mbox_anchorbox[:, 1]) # 真实框距离先验框中心的xy轴偏移情况 decode_bbox_center_x = mbox_loc[:, 0] * anchor_width * 0.1 decode_bbox_center_x += anchor_center_x decode_bbox_center_y = mbox_loc[:, 1] * anchor_height * 0.1 decode_bbox_center_y += anchor_center_y # 真实框宽高 decode_bbox_width = np.exp(mbox_loc[:, 2] * 0.2) decode_bbox_width *= anchor_width decode_bbox_height = np.exp(mbox_loc[:, 3] * 0.2) decode_bbox_height *= anchor_height # 真实框box decode_bbox_xmin = decode_bbox_center_x - 0.5 * decode_bbox_width decode_bbox_ymin = decode_bbox_center_y - 0.5 * decode_bbox_height decode_bbox_xmax = decode_bbox_center_x + 0.5 * decode_bbox_width decode_bbox_ymax = decode_bbox_center_y + 0.5 * decode_bbox_height anchor_width = np.expand_dims(anchor_width, -1) anchor_height = np.expand_dims(anchor_height, -1) anchor_center_x = np.expand_dims(anchor_center_x, -1) anchor_center_y = np.expand_dims(anchor_center_y, -1) # 先验框的五个人脸关键点 mbox_ldm = mbox_ldm.reshape([-1, 5, 2]) decode_ldm = np.zeros_like(mbox_ldm) decode_ldm[:, :, 0] = np.repeat(anchor_width, 5, axis=-1) * mbox_ldm[:, :, 0] * 0.1 + np.repeat(anchor_center_x, 5, axis=-1) decode_ldm[:, :, 1] = np.repeat(anchor_height, 5, axis=-1) * mbox_ldm[:, :, 1] * 0.1 + np.repeat( anchor_center_y, 5, axis=-1) # 真实框landmarks decode_bbox = np.concatenate((decode_bbox_xmin[:, None], decode_bbox_ymin[:, None], decode_bbox_xmax[:, None], decode_bbox_ymax[:, None], np.reshape(decode_ldm, [-1, 10])), axis=-1) decode_bbox = np.minimum(np.maximum(decode_bbox, 0.0), 1.0) return decode_bbox
如果使用了letter_box进行填充,还需要根据缩放系数和偏移量算出正确的位置:
def retinaface_correct_boxes(result, input_shape, image_shape): new_shape = image_shape * np.min(input_shape / image_shape)offset = (input_shape - new_shape) / 2. / input_shape scale = input_shape / new_shape scale_for_boxs = [scale[1], scale[0], scale[1], scale[0]] scale_for_landmarks = [scale[1], scale[0], scale[1], scale[0], scale[1], scale[0], scale[1], scale[0], scale[1], scale[0]] offset_for_boxs = [offset[1], offset[0], offset[1], offset[0]] offset_for_landmarks = [offset[1], offset[0], offset[1], offset[0], offset[1], offset[0], offset[1], offset[0], offset[1], offset[0]] result[:, :4] = (result[:, :4] - np.array(offset_for_boxs)) * np.array(scale_for_boxs) result[:, 5:] = (result[:, 5:] - np.array(offset_for_landmarks)) * np.array(scale_for_landmarks) return result
最后根据正确的预测值在图片画出即可。
三、运行结果
四、预告
人脸识别预处理过程之人头姿态估计。